My life revolves around photography; Landscapes, Portraits and other social photography, flowers and macro photography are all areas that interest me. I have had several photographs published I have just become a professional photographer.
Website: www.paulcullenphotography.com
Flickr: paul2210
Photography Blog: paulcullenphotography.co.uk
Wine Blog: uncorkedbottle.uk
Twitter: @PaulCullenphoto
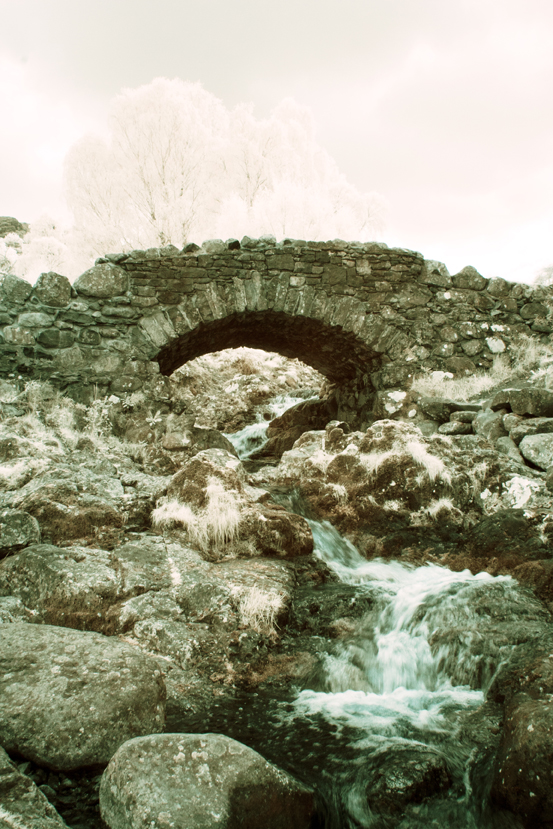
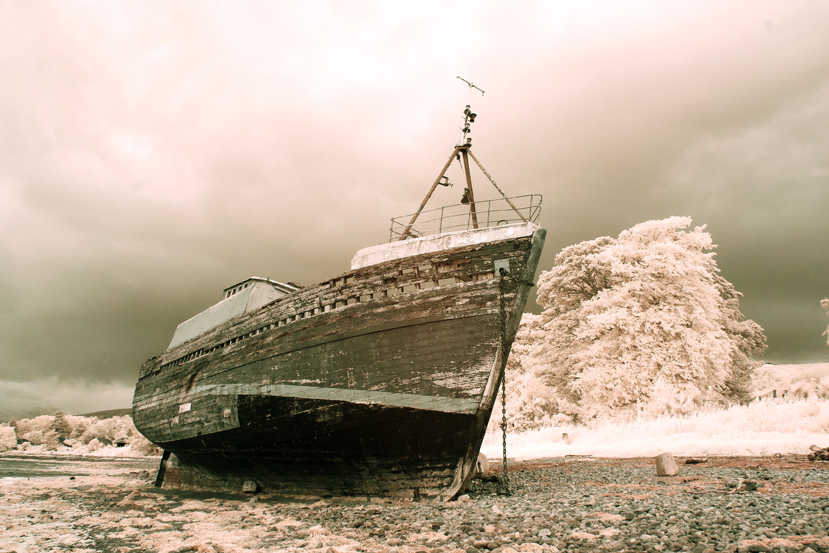
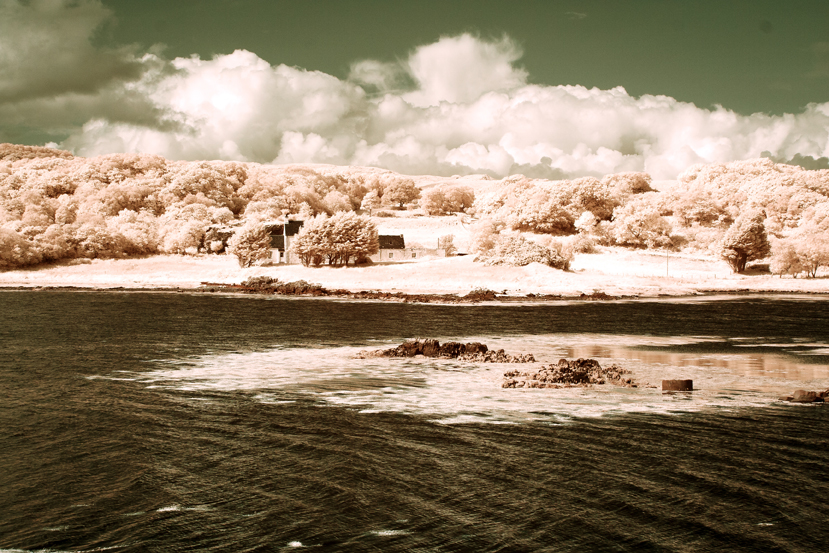
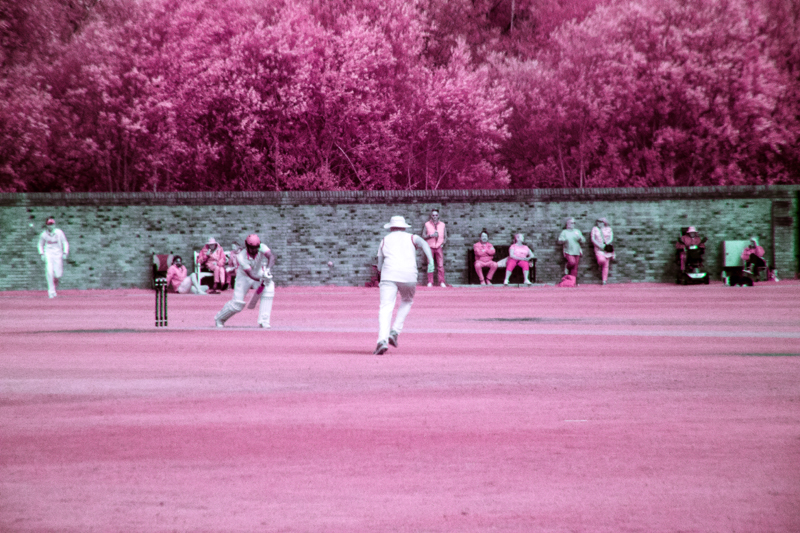
I said in my last post that I would post some of my infrared photographs that I have processed as colour. Here is a selection, firstly from the camera that had been converted with a 720 nm filter over the sensor, then from the full-spectrum camera with a selection of filters fittted to the front of the lens.
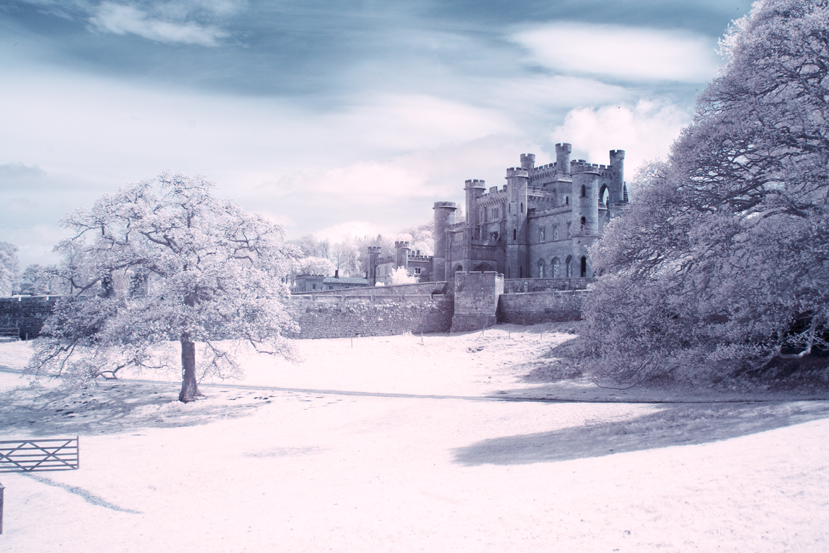
Canon 350D – Converted Camera:-
The above two images are the same original image. The first one was processed using channel mixing and layers and the second one shows what happens when you then adjust the hue – in this case plus 163.
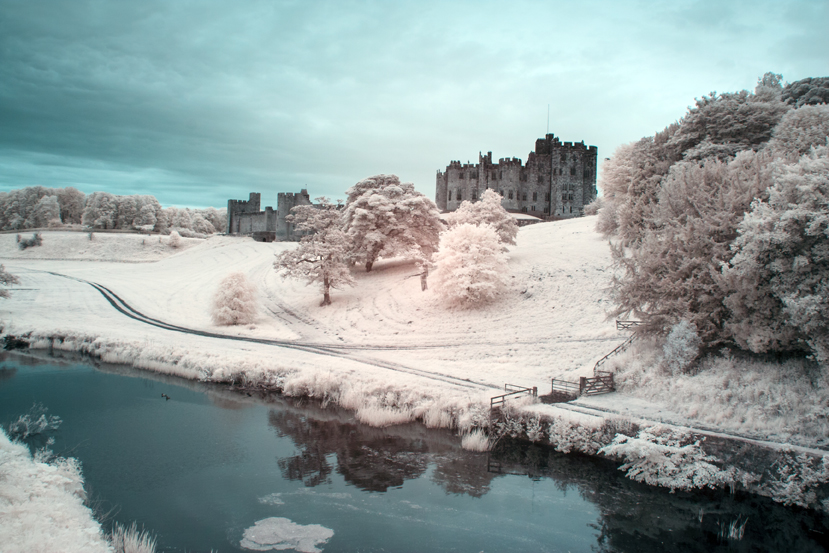
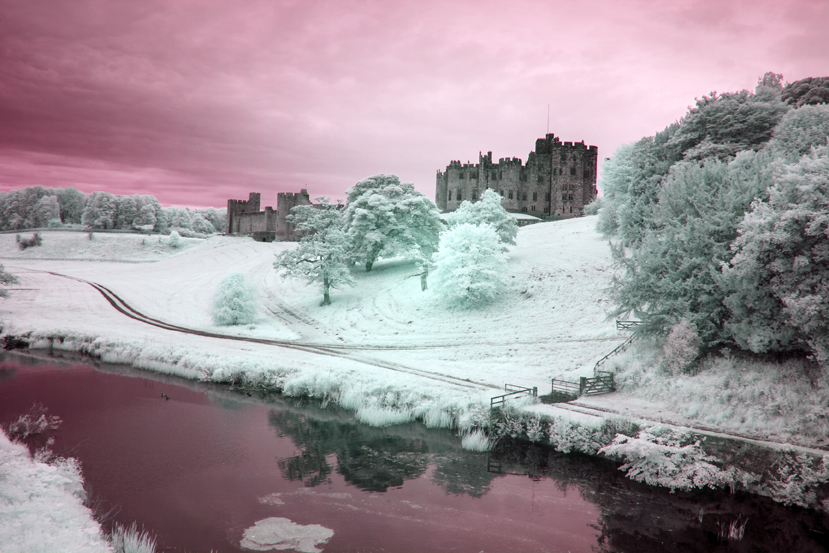
I have done the same with the next two images of Alnwick castle – first the one without hue adjustment and the second one with a positive adjustment of about the same magnitude, although, a small negative or positive adjustment can make quite a difference and I would urge you to experiment.
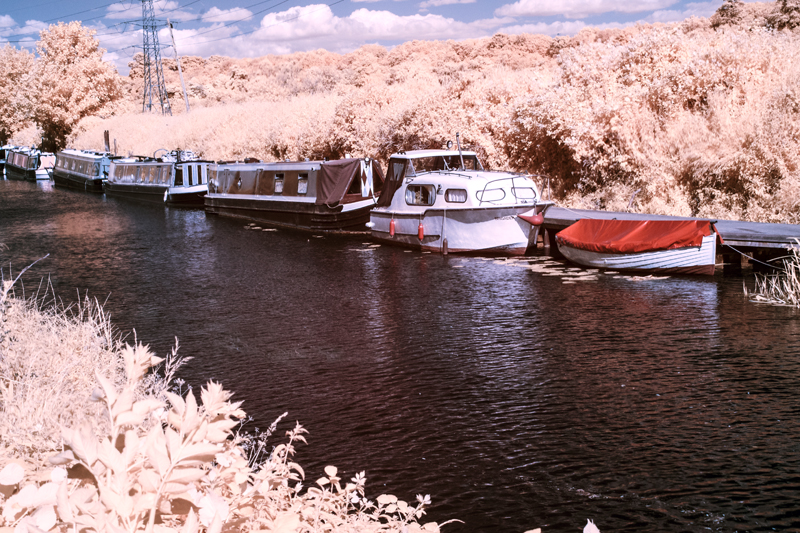
Full Spectrum Camera with Variable Filter.
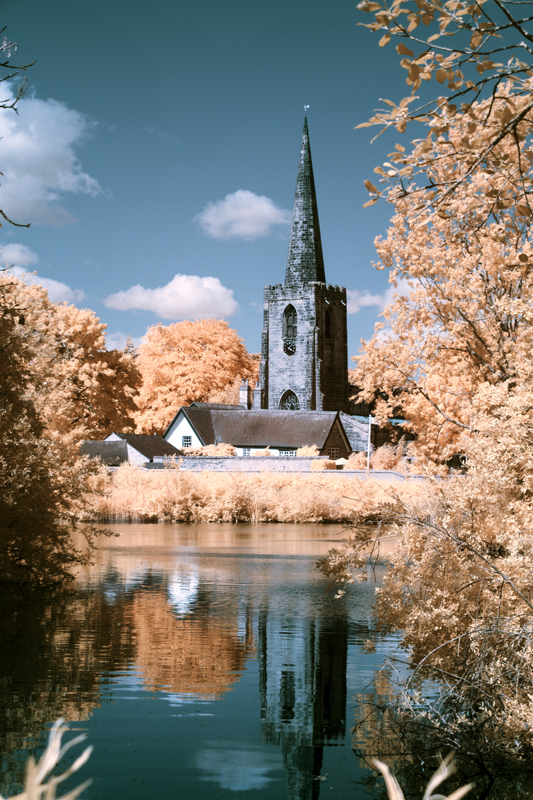
530 nm:-
Hue minus 50No Hue Adjustment.Hue minus 50No Hue AdjustmentHue +/- 180
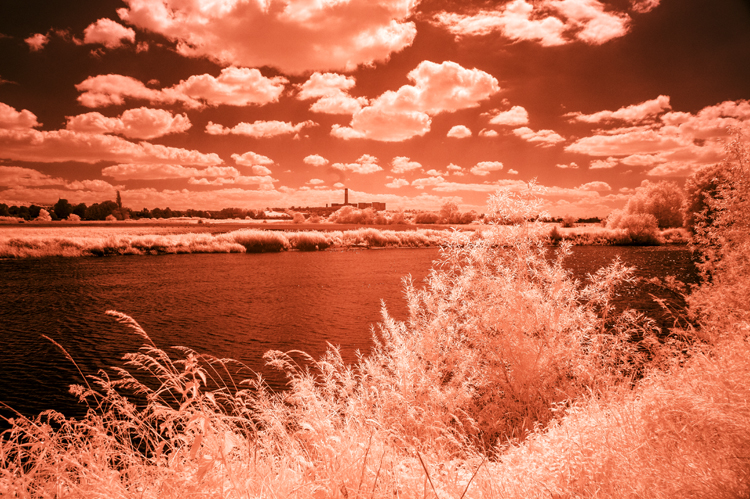
Filter set to 640 nm (approx):-
No Hue AdjustmentNo Hue AdjustmentHue minus 28
You will notice that there is more of a red tone predominately in the originals – turning the trees orange instead of yellow as with the 530 nm filtration.
750 nm:-
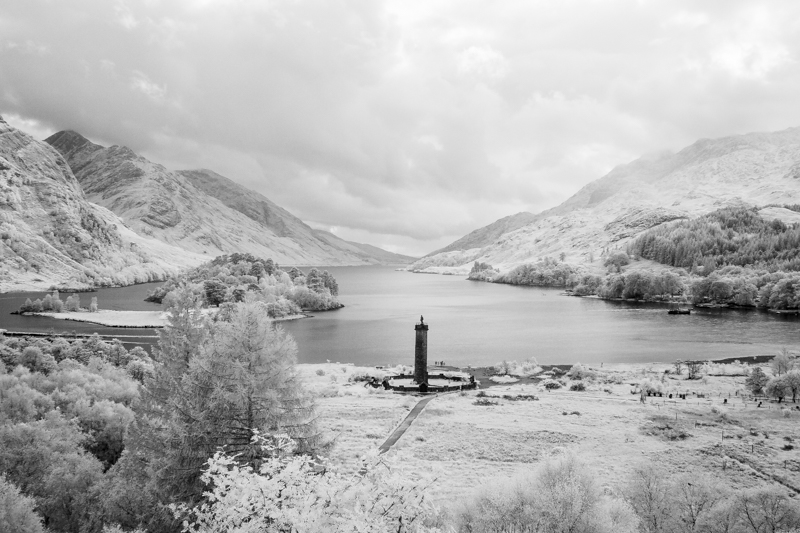
No hue adjustmentConverted to Black and White
With the 750 nm filter there was not much scope for hue adjustment because very little visible light was getting in, mostly infrared. I could have added a bit more contrast to the monochrome image but there was little hope of getting much of value with the channel mixed version.
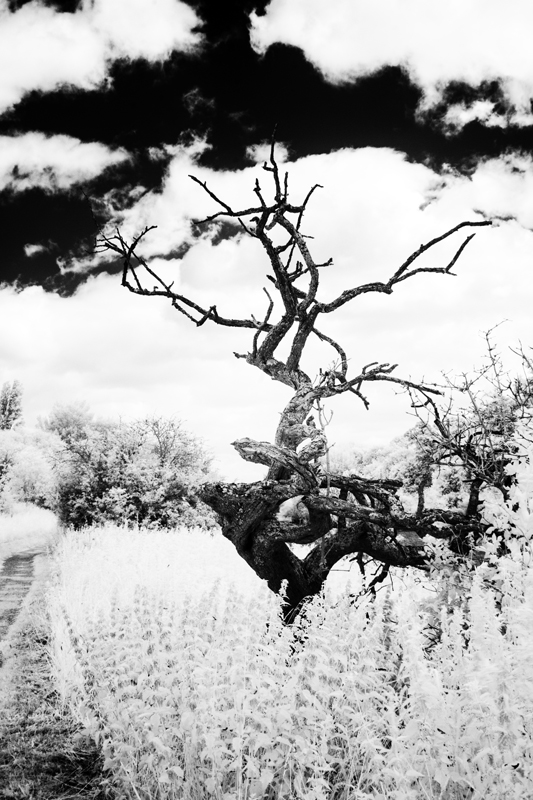
850 nm Filter:-
Channel MixedConverted to Black & White
As with the 750 nm filter there was no scope for bright and colourful images but with the mono conversion, I got a beautifully contrasty image.
It occurs to me that to get coloured “infrared images” we have to let a bit of visible light in too and experiment with the image using a myriad of adjustments using channel mixing, layers, curves to mention a few, to suit your individual taste. So far, I have only given you the basic version of channel mixing. Some mixes involve adjusting the green slider, having different mixtures of the red and blue channels or a combination of all these. Even then you are just scratching the surface. I mentioned Rob Shea a few posts ago, he provides a whole range of Camera Profiles for different cameras. He also provides a wide selection of Photoshop Actions which can be imported into Photoshop – instead of making the adjustments of Channel Mixing, Layers and other adjustments, you click on an “Action” and the effect of several adjustments are applied in one click. Follow these links for more:-
There are full instructions on his site on how to install these resources andyou can have them and much more for the price of giving him your email address. I have them and in terms of the Photoshop Actions, a good way of finding out about the many adjustments that you can try out and provide a quick way of finding out which adjustments and effect you like.
I must say at this juncture that I have no connection to Rob Shea except I follow him on Instagram.
That is all for today folks. I hope that you will be back soon.
Today, I’m not going to talk about which make or model of camera to use for infrared photography but instead talk mostly about conversion types for infrared photography (or using an unconverted camera) and my variable experience of the different pros and cons of each.
I started out with a Canon 350D (or Rebel XL) DSLR in which the filter over the sensor, which most digital cameras have, to limit the light falling onto the sensor to the visible spectrum (380 nm to 790 nm), had been removed and replaced with a filter which limits the light that falls onto the the sensor to around 720 nm and above in the near-infrared spectrum – in the case of infrared photography, we are usually interested in the range 700 nm to 900 nm. This is a permanent change, you create a custom white balance for your camera and off you go taking photographs. I always recorded .TIFF files and processed them in lightroom. In the early days, I processed them as black and white, usually by turning down the saturation and increasing the contrast – there are better ways of doing this but perhaps I’ll keep that for another post. Recently, I have gone back and re-edited some of these images as described in my previous post using Lightroom and Photoshop – channel mixing, layers, curves after creating a Camera Profile. I was really quite pleased with the results. I thought that they were “special and different” and perhaps some of them were of commercial value but the file sizes were a little small (10 Megapixels camera) for my uses so I went on the hunt for a converted camera with a higher pixel count, what I discovered was a Full-Spectrum camera (at over 20 megapixels).
A full spectrum camera has had the filter removed that limits the light hitting the sensor to the visible range and instead, a clear filter is placed over the sensor – or in some cases, no clear filter is used. This camera can “see” everything from ultra-violet to well into the near-infrared spectrum. The filter that was removed also stops the blue end of the spectrum. It can be used without additional filters but tends to render as very blue once the custom white balance is set. To record our “infrared images” we need to put a filter over or under the lens to choose which frequencies of light we want to record. This is where the fun begins because this camera has much more flexibility but you have to buy filters to take advantage of that.
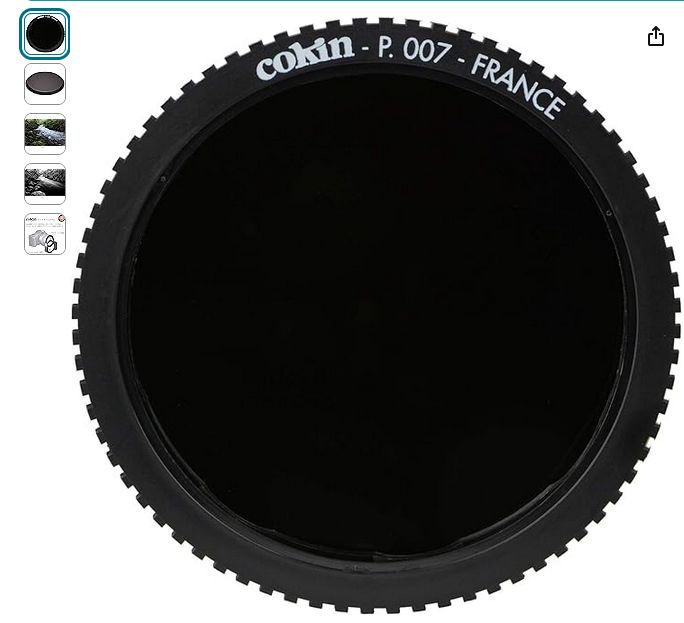
I first bought a Cokin P007 Infrared 720 nm (89 B) round filter. This filter is used in front of the lens as part of the Cokin P series filter system which I already owned.
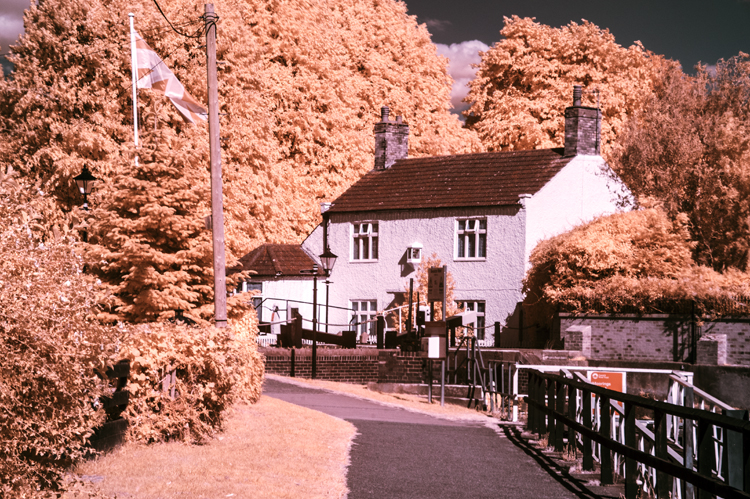
As you might suspect, it filters the light entering the camera in simple terms, to 720 nm and above. It is a very dark filter which makes focusing difficult with a traditional DSLR with a mirror – hot tip – mirrorless cameras don’t have this problem as you are seeing a digital image in your viewfinder from the sensor not a reflection in a mirror. 720 nm is the popular choice for infrared, in fact it is difficult to get other frequencies if you are on a budget. Here are some examples of how my early efforts of using this filter turned out after processing them by channel mixing and layers adjustments that I described in my previous post.
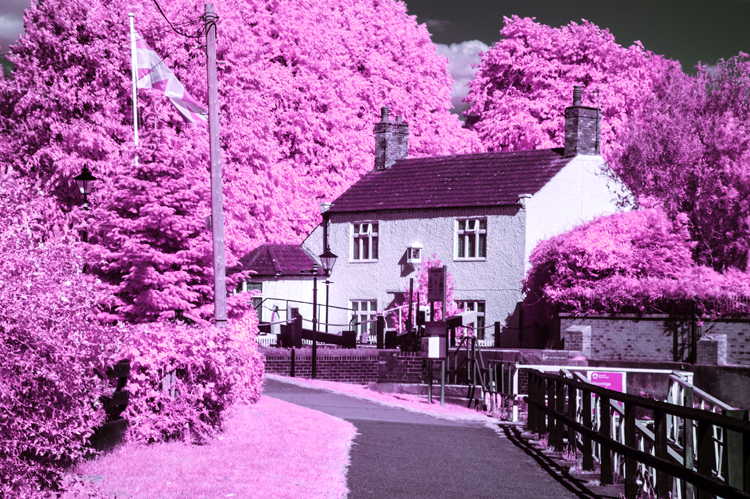
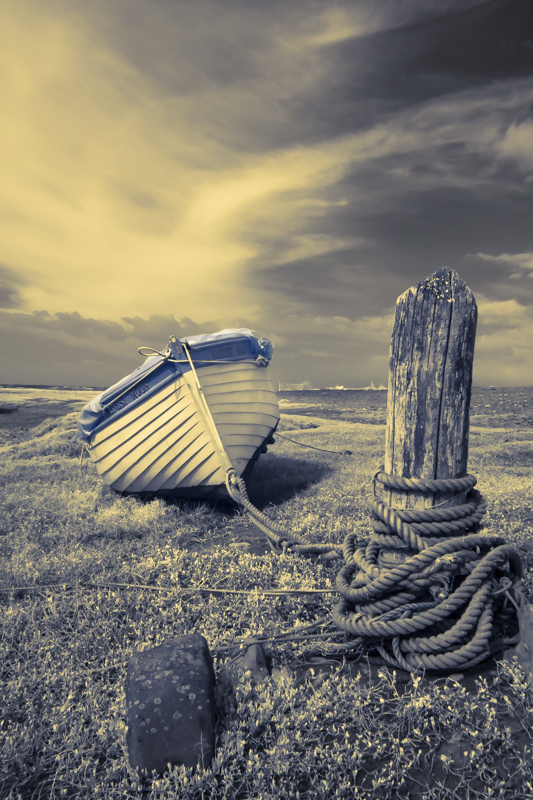
And here is the same image after I applied a hue adjustment of – 60
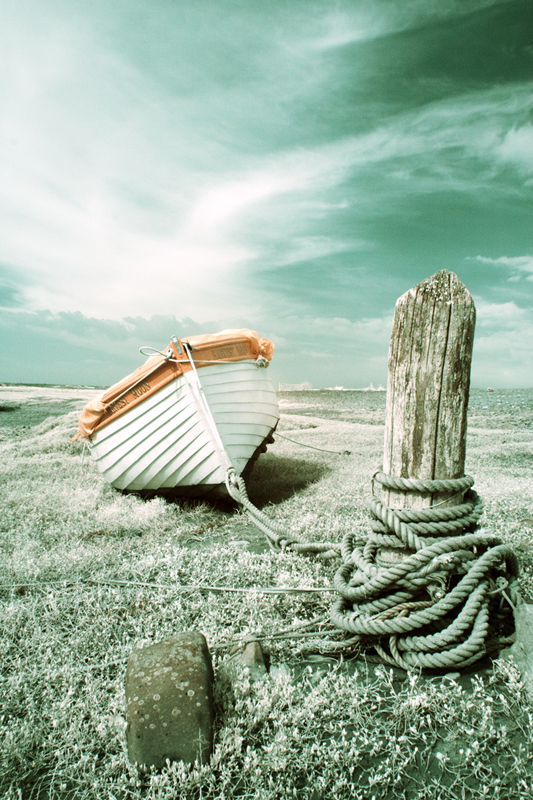
The people from whom I bought the full spectrum camera showed an example of an image where the filter used was a Cokin Orange filter. I already had one of those from my old black and white film days, so I thought that I might give it a try instead of the 720 nm filter (the orange filter gives filtration of about 590 nm. Here are my results:-
At around 590 to 625 nm, quite a lot of the visible range gets recorded and so lends itself to lots of experiments with the sliders and I do like to experiment and so, it seems, do many other exponents of coloured infrared photography – it is really a bit of a mixture between infrared and the visible spectrum photography, but it does give interesting results.
There are manufacturers who produce variable frequency infrared filters. One such filter is the Hersmay Infrared 6 in 1 adjustable Infrared pass filter – 530 nm to 750 nm. Basically, it screws onto the front of the lens and then you twist the filter to increase or decrease the minimum wavelength (I am using frequency and wavelength interchangeably). Here is the filter which I bought on Amazon at a fairly reasonable price:-
It is very useful but I did find the images quite soft, especially at the 750 nm end – it is a compromise but matters improve at low sensor sensitivity (iso 100). Some of the images created using this filter:-
530 nm530 nm with hue 180 – that is plus or minus.530 nm530 nm – hue minus 60640 nm640 nm hue minus 67640 nm hue plus 40.750 nm750 nm hue plus 22
You will see from these examples that there is more variation on colour in the lower fregencies of light as more of the visible spectrum of light is recorded by the sensor. Filters are available in the range of 850 nm to 900 nm but images created with them will almost all be converted to black and white images, indeed you could argue that even 750 nm would probably be better as bleack and white. These higher frequencies produce the most crisp and contrasty black and white images of all so it’s “horses for courses!”
You can also get filters which fit snugly inside your camera, behind the lens but in front of the sensor. They are available in a range of frequencies – I believe that they are very good quality but also very expensive. Do a search for Kolari infrared filters to find out more (Kolari also do a range of filters for in front of the lens too).
Finally, you could put an infrared filter such as the Cokin P007 720 nm and take photographs. I tried it but exposure was a problem due to the filter which favours the visible spectrum. With long exposures you will get infrared images but use a tripod! Many people do this but I found the very long exposures limiting.
So:-
Converted cameras with dedicated filter.
Pros:-
No need to buy extra filters.
Normal exposure times
Excellent quality images
No need to carry lots of equipment
Cons:-
Limited to one frequency
Less flexible option
Camera is a “one-trick-pony”
Full Spectrum Camera.
Pros:-
Flexibility over which part of the spectrum of light you use.
Changeable filters
More variety of images possible
More scope for experimentation
Cons:-
You have to have a range of filters to provide that flexbility
You have to carry more gear (filters)
You would realistically have to use an anti ultraviolet filter to use as a normal camera
The sensor picks up more red than a normal camera in many cases.
Un-adapted camera with an Infrared Filter.
Pros:-
You can use your normal camera as long as it can hold filters.
Cons:-
Long exposure times
Probably need a tripod to get the best out of it.
Effects of long exposure – blurred water, birds, clouds, trees
One final word. It is possible to convert any camera to work with infrared as a full spectrum camera. With the dedicated IR filter conversion, it would also be necessary to source a say 720 nm replacement filter – I would like to add that any conversion is best done by someone who knows what they are doing. If you are going to choose full spectrum or an un-adapted camera, you will need some method of attaching a filter, so realistically, you are probably best with a DSLR or Mirrorless camera.
I’ll show you more of my images later. Hurry back for the next installment and have a great day!
In my post, I wrote about how I fell in love with infrared photography and how for years I converted my images to very stark, contrasty black and white images. I was very pleased with them but recently, I started to see more and more infrared images that were in wonderful and strange colours. I decided to find out how these images were produced. Todays post is about some of the ways that can be achieved. One thing that I found was that there is plenty of room for experimentation and the way that I am going to demonstrate is only a starting point.
The methods that I describe involve working on RAW files in Lightroom or Camera Raw in Photoshop. You could use .jpgs from your camaera but you will have very limited control over the end product. To do what we are going to do, use the RAW files.
First you have to create a camera profile which you will need to get the best effects. Lightroom and Photoshop use Adobe Standard which gives very different results for the file that you will work on in image editing.
You will only have to create a Camera Profile once. After it has been created it will appear automatically in both Adobe Camera Raw and Lightroom if you have it.
Here is how to create your Camera Profile in Camera RAW in Photoshop:-
First, open your RAW file in Photoshop. This will automatically open up Camera Raw.
Save the file as a .dng file in a convenient place.
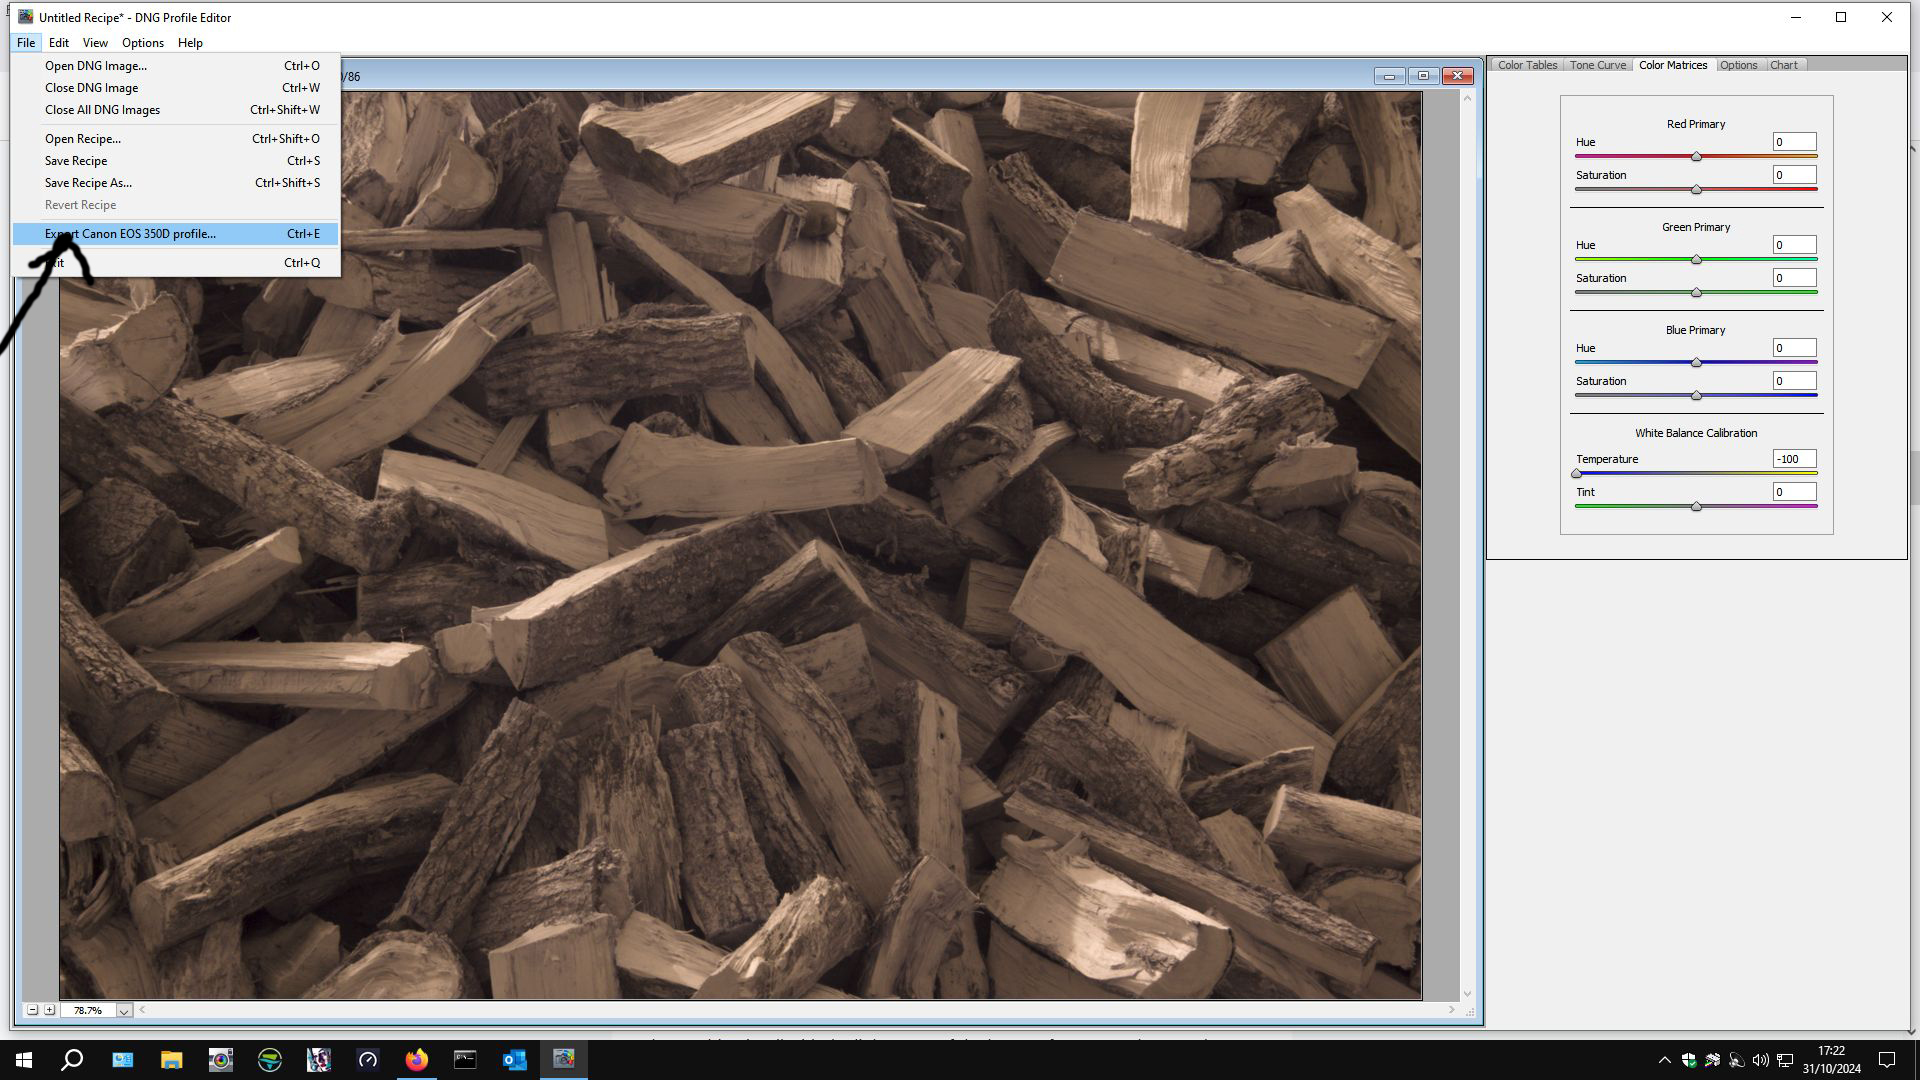
Next open up DNG Profile Editor. If you don’t have DNG Profile Editor you can download it from here:-
Or search online for Adobe Digital Negative – it is a free utility.
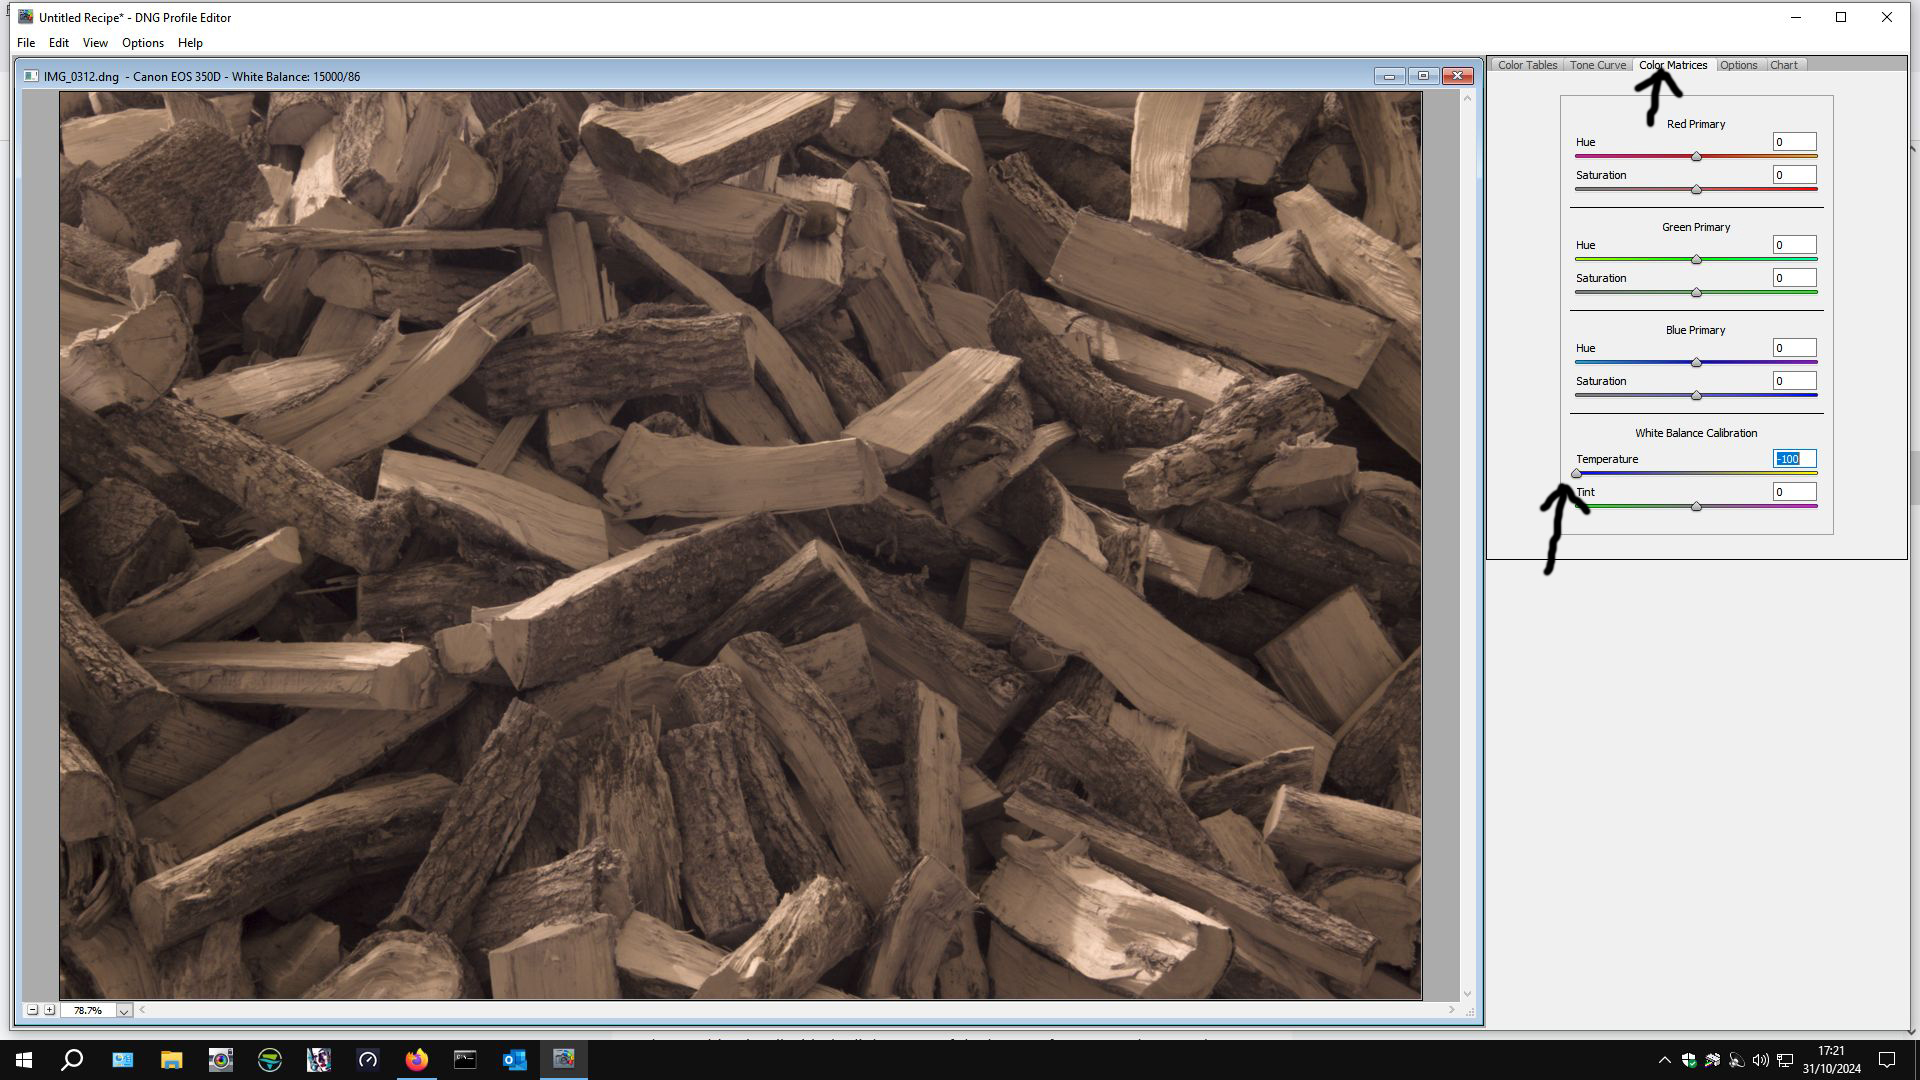
When you open DNG Profile Editor open your .dng file from where you saved it.
When it opens up, go to the color matrix tab on the right-hand side.
Then slide the temperature slider over to the left. Some people say to -90, others -100. I set mine at -100. Then export the profile – DNG Profile Editor will have read which camera you have used and this will form part of the profile name.
Navigate to C:\Users\<<your username>>\AppData\Roaming\Adobe\CameraRaw\CameraProfiles\ and save your camera profile in there. It comes up with a title for your profile but the middle part says “untitled”. You can customise the title – it allows for multiple profiles for the same camera to be created.
A word of caution \AppData\ is a hidden file so you may have to “show hidden files” within your file options in Control Panel. If you don’t know how to do that, there are many good online resources that will help you to do that.
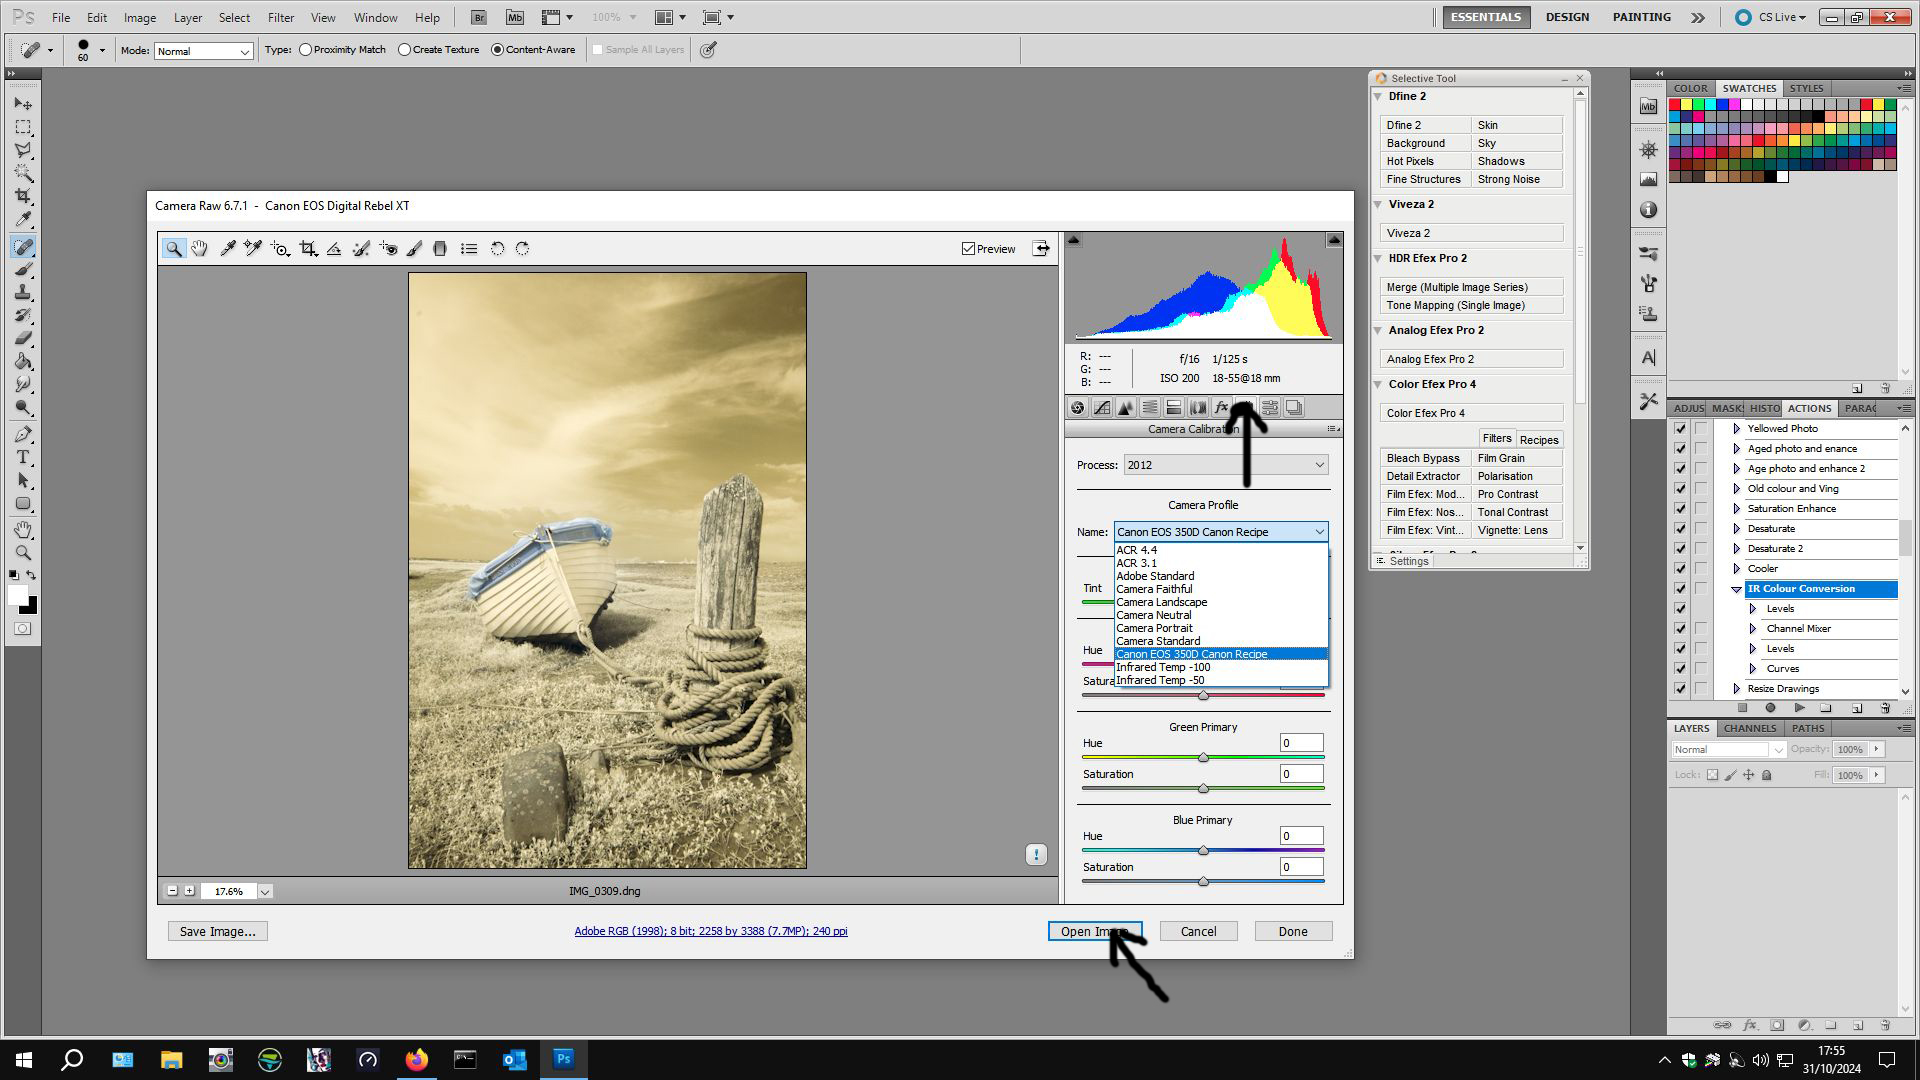
If you have used Photoshop and Adobe Camera Raw, open your .dng file in Photoshop again. Camera Raw will open up again, this time go to Camera Profiles in Camera Raw (arrowed):-
From the drop-down list click on the camera profile that you have created then click Open Image (second arrow) and your image will open in Photoshop.
Instructions for creating a Camera Profile if you use Lightroom.
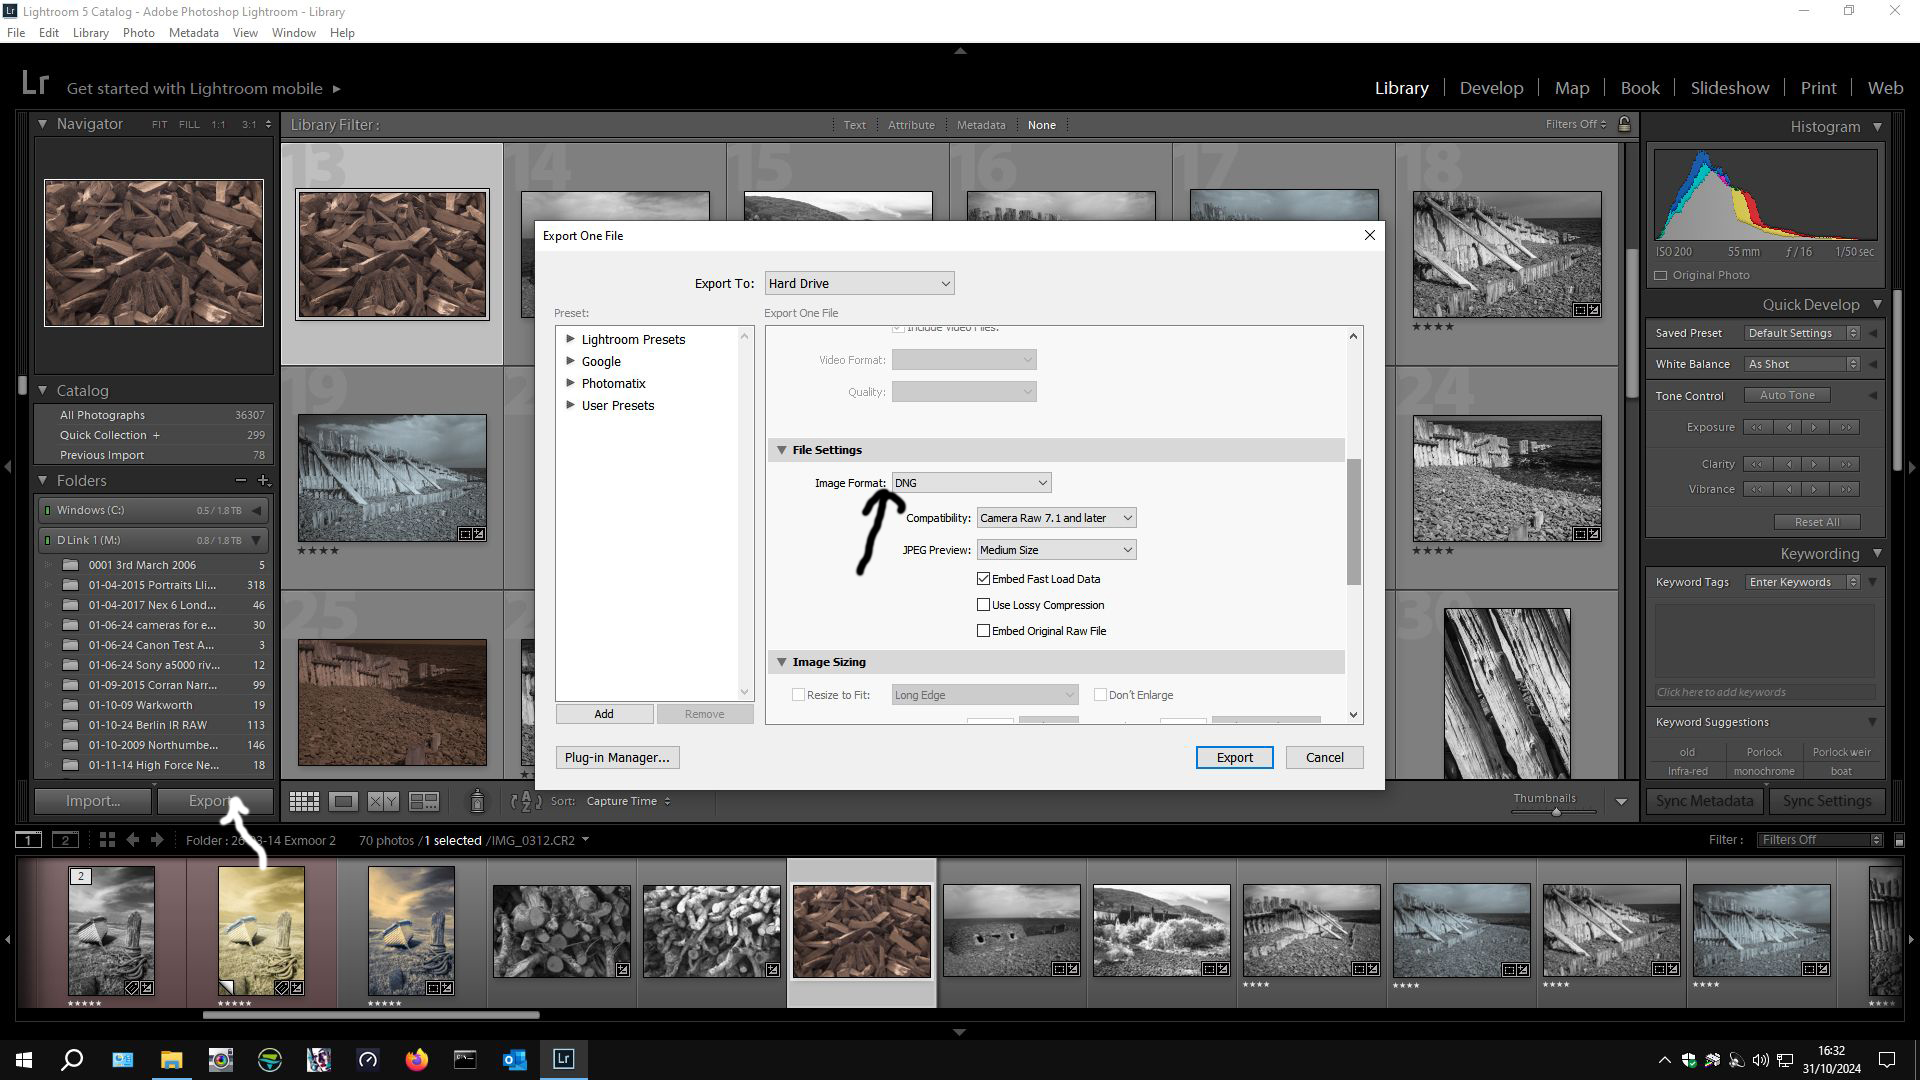
Import your RAW files into Lightroom as usual. Choose one file and export it as a .dng file and remember where you saved it to.
Then open DNG Profile Editor as before and create your Camera Profile. Restart Lightroom and then edit the rest of your .RAW files using this camera profile instead of Adobe Standard.
Camera Profile is found at the bottom left hand side (arrowed). Make whatever adjustments that you want to make – I usually click “auto” because any other adjustments can be made in Photoshop. I sometimes tweek “clarity”. If part of the image is “blown out” I adjust white levels. It is a very individual thing – this is my way, there is no one way – experiment. Then I export the file using what ever format you like. I usually export as .TIFF files at 300 dpi for best quality but if you have Lightroom, you will know how you like to export your files.
Whatever way you have created your Camera Profile, open them in Photoshop to work on them. If you have gone the Photoshop – ACR route, open your RAW file in photoshop and ACR will open, apply the Camera Profile then Open Image. The image will open in Photoshop ready to be worked on. If you went the Lightroom route, open your saved file in Photoshop ready to be worked on.
Drum Roll…..
Once in Photoshop (or any other Photo editing suite capable of Channel Mixing):-
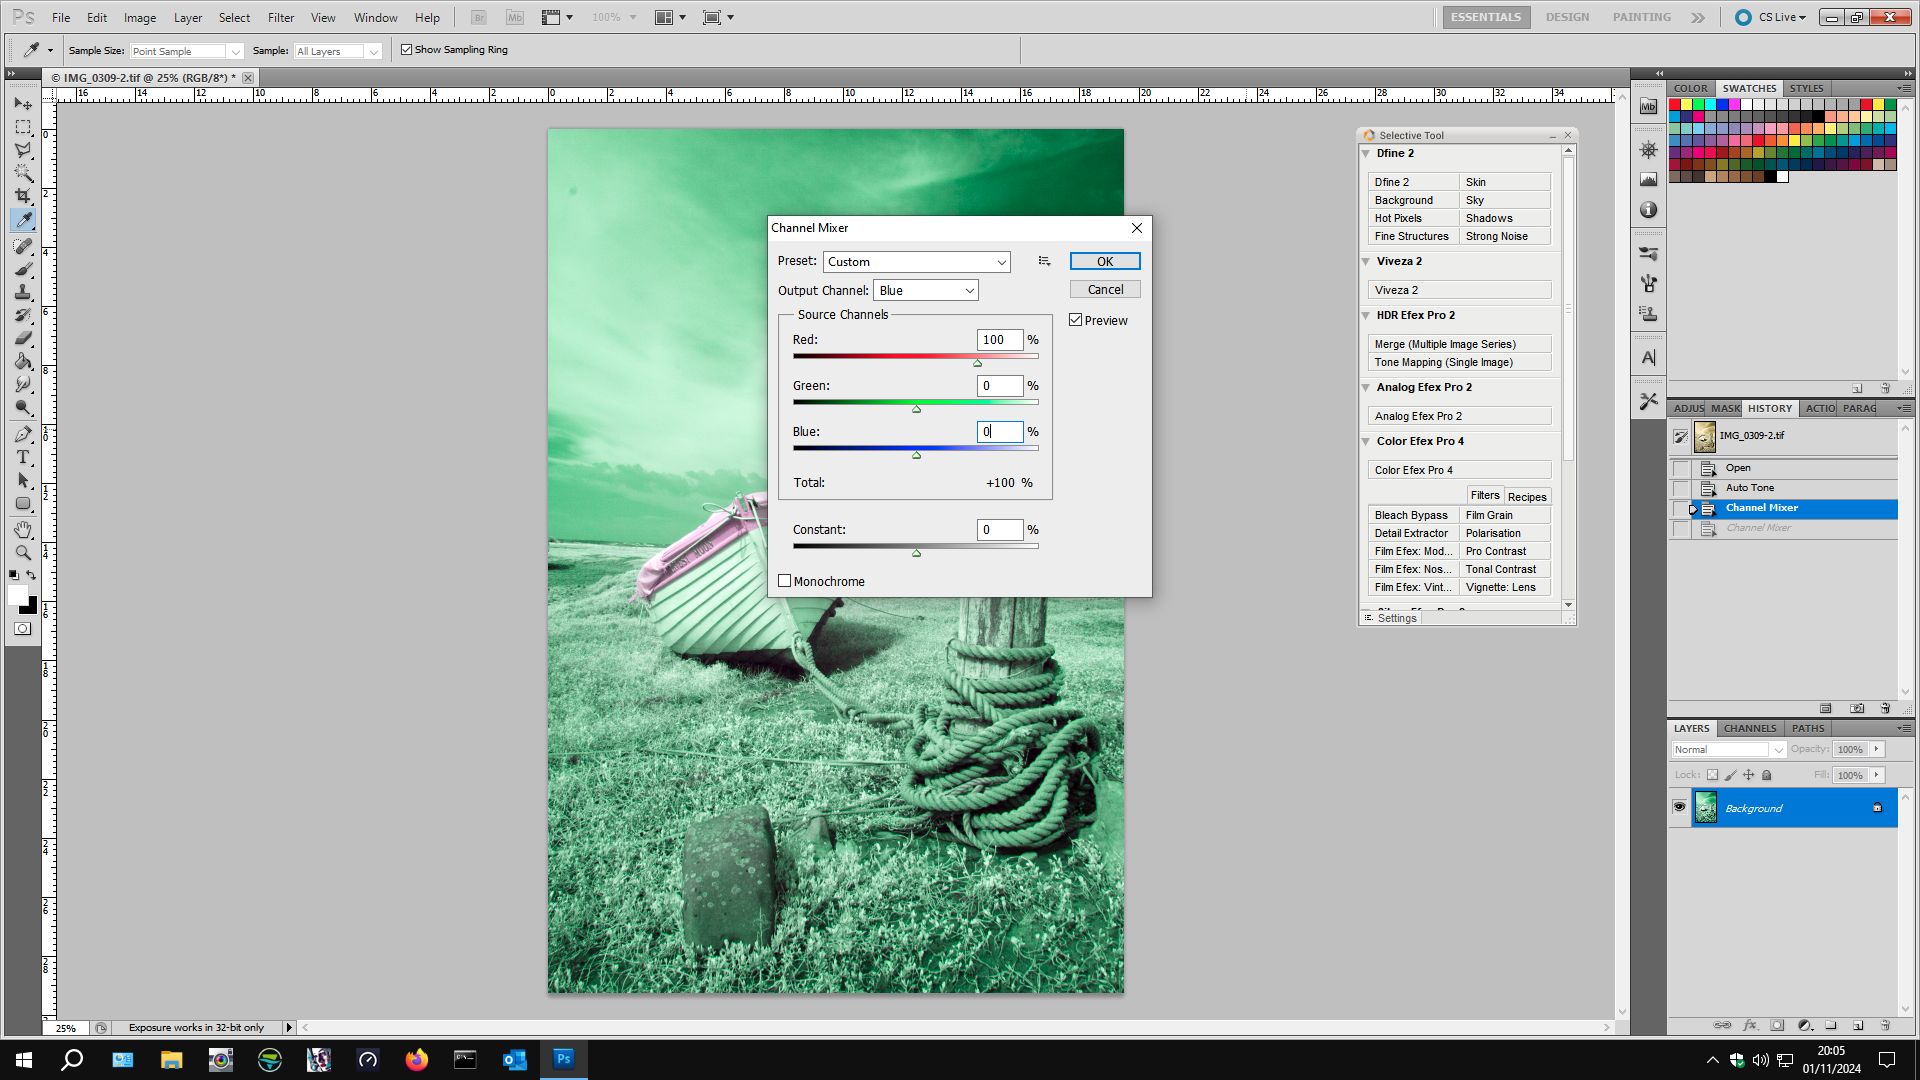
Image > Adjustments > Channel Mixer.
Select Red from the drop-down list. Slide the Red slider to 0 from 100 and the Blue slider to 100 from 0.
Select Blue from the drop-down list and move the Red slider to 100 from 0 and the Blue slider to 0 from 100. The image will turn funny colours. Click OK.
Next, open image > adjustments > levels.
Select Red from the drop-down list (Default RGB) and move the right slider to 220 from 256. Select the Blue Channel and move the middle slider to 0.70 from 1.00. Click ok.
Below is my file from Lightroom (This is how it looks when you open it from ACR too after Camera Profile has been applied).
The file that you start to work on in your image editing software will look something like this. You could convert it to black and white but we are going to give it some colour to produce something like:-
This is how this file turned out after I applied the Channel mixing and Layers adjustments described above were applied.
In addition to these basic adjustments, I also like to apply an Auto Tone before Channel Mixing and Layers adjustment to give it a bit more punch. After applying Channel Mixing and Layers, you might like to apply Curves to improve contrast (or reduce it). You could apply other basic adjustments “to taste”. One way to change the colours dramatically with “artistic effect” is to alter the Hue (image > adjustments > Hue/Saturation) – have a play by experimenting with positive and/or negative values for hue to get different effects. You might want to apply a saturation and/or brightness adjustment but I find that I get better results with Brightness/Contrast Curves, or Vibrance.
There are many ways to create coloured infrared images. This is just to get you started and it is my way, this is how I started. Internet searches will yield many ways, based more or less on this basic editing technique, to create fantastic coloured infrared images so my advice is start doing what is described here and then start to experiment with your images, search the internet for people who excel at this. A couple of names to search for:-
Rob Shea
Matthew Stuart Piper
Both have websites with lots of examples of excellent work.
Next Post, I will give more examples of my infrared images of which I have created coloured versions
What do you think of infrared photography? Most people associate it with contrasty black and white images but increasingly we are seeing lots of coloured infrared images – some people dislike them as they don’t look normal – it is true that they challenge ones perception of colour but I love them and I wanted to tell you about my journey with digital infrared photography. It began in 2009 when I attended a photographic workshop with Lee Frost (Photographer, Photo Mag journalist, author and all round nice guy). He loaned out his Canon 20D which had been converted to record the infrared spectrum of light – I use the term loosely, as I’ll explain later. There is a filter over the digital sensor which only allows visible light to hit the sensor – your pictures would have a strong red look without it. With a converted camera, this filter is removed and replaced with a filter that allows mostly the near infrared spectrum. Light travels in waves, as we know; we usually refer to them by the wavelengths. The wavelengths of the “colours” of visible light are as follows:-
Violet 380 nanometers (nm) to 450 nm
Blue 450 nm to 485 nm
Cyan 485 nm to 500 nm
Green 500 nm to 565 nm
Yellow 565 nm to 590 nm
Orange 590 nm to 625 nm
Red 625 nm to 750 nm
The most common replacement filter is probably allows 720 nm and above. After conversion, you have to reset the white balance and it is possible to make you camera produce black and white .jpgs straight out of the box.
So, I borrowed Lee Frosts converted camera and then played with the RAW files in Lightroom when I got home, and I was hooked. I quickly purchased a second hand Infrared converted camera and set about producing very contrasty black and white photographs. I loved it. I continued to do so for several years.
This image was created at Porlock Weir in West Somerset and I processed the RAW file for this image to make it black and white in Lightroom. There are many different ways to do this but I think that I just turned the saturation slider right down and boosted the contrast.
When you open out the RAW file in lightroom, it will often have a brown or bluey grey colour and there may be some colour present. I hadn’t set up a camera profile at this stage. I will reveal a method for doing that in a later post, but at this stage, I was just playing. This is an example of how my RAW files looked:-
Other examples of my black and white infrared images:-
Recently, I discovered how to process my infrared RAW files to produce coloured infrared images and I will write about those soon – how to create them (my method, at least), I will show examples of what happened when I processed these images as colour and what I did next. Please come back soon.
I was introduced to long exposure photography in the autumn of 2009 whilst on a three day photographic workshop run by Lee Frost. Lee is a photographer, journalist, writer and leader of photographic workshops and tours. He used to edit and contribute to many of the popular photographic technique magazines and has written many books on the subject. The workshop that I took part in was a “Castles and Coast” tour of the Northumberland coastline. Lee introduced me to long exposure photography and I have been hooked ever since. Here are some of my images:-
Amble Pier, Amble Northumberland basking in the early evening light.
This image is of Amble Pier and it was created in March 2011 on a subsequent visit to Northumberland.
My way to take long exposure landscape photographs during daytime!
There are many ways of capturing long exposure photographs depending on light levels, conditions and subject but they have some things in common:-
You will need a sturdy tripod.
A means of timing more than 30 seconds shutter speed – I have used a wrist watch but better ways are available such as remote shutter release buttons with timers.
Patience! – Your exposure time will be matched by a subsequent processing time.
A method of blocking light out of viewfinders because light can seep into the viewfinder during such a long exposure. Some cameras have a shutter over the viewfinder.
It can be very absorbing so make sure that you remain safe; sometimes you don’t notice the tide coming in and getting your feet wet – or worse, you get cut off from the shore!
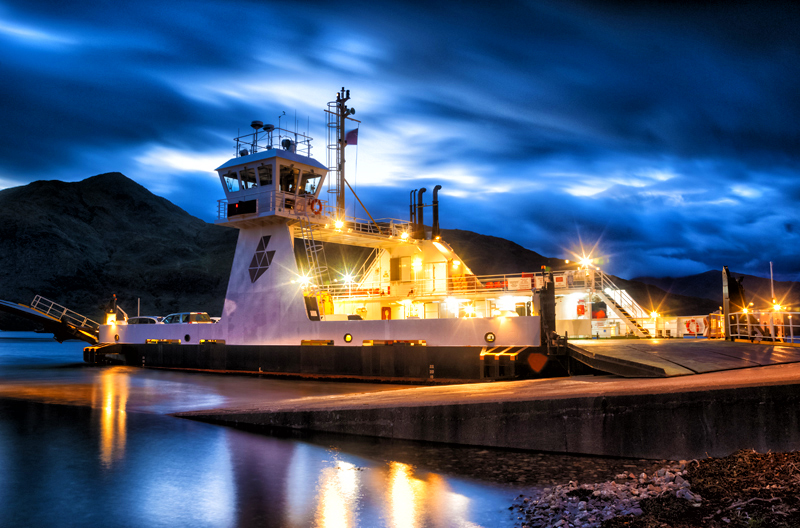
Corran Ferry, Corran Narrows, Loch Linnhe, Lochaber, Scotland at Dusk.
Depending on the effect that you wish to achieve will dictate how long in terms of shutter speed you will set – showing slight movement might only need large fractions of a second – 1/4 sec for example, but for the milky water that I favour or perhaps star trails will require much longer shutter speeds. The image of Amble pier had a shutter speed of about two minutes.
In order to correctly expose your image, you will need to use techniques to restrict the amount of light that gets in over time – by using a very small aperture (or large number f-stop value). This can be good for depth of field in landscape photographs such as ‘Amble Pier’. For this image the f-stop was between f22 and f28. It is worth remembering that high f-stops such as this can cause chromatic aberation – green and purple (in many cases) along lines in your image due to how much the light is bent to get through the aperture – use with caution, particularly over f16. I got away with it here and indeed, because of the combination of depth of field and limiting the light into my camera, I often use f22 to f32. If you want a limited depth of field, of course you would choose a much smaller f-stop (larger aperture) – f4 for example.
Rocks near Craster, Northumberland.
Another thing that you can adjust on Digital cameras is ‘iso’. This adjusts how sensitive to light your sensor is. iso 50 is ‘quite insensitive’ – it takes a relatively large amount of light to register on the sensor, iso 100 is more sensitve to light but still gives great quality if there is sufficient light. Iso 3200 is very sensitive – great for low light conditions but it creates a lot more noise. The measurement of iso came from the days of film photography. There are a lot of people who still use film today but you have to choose the sensitivity required before loading a new roll of film. I started off using film and a roll of Fuji Velvia with an iso of 50 gave photographs with very fine grain, while Ilford Delta 3200 (iso 3200) is very grainy but great in low light conditions as it is very sensitive. For long exposures I use iso 100 for great quality and limited sensitivity – remember, we are trying to limit the light over time to capture movement. With digital cameras, you can change the iso on a shot by shot basis.
Ballachulish just after sunset in early September 2015. Looking out to where Loch Leven joins Loch Linnhe near Glencoe in the Scottish Highlands.
Correct exposure is achieved with the right combination of aperture, shutter speed, iso and light levels. Sometimes, you have optimised the shutter speed, iso and the aperture but the ambient light is far too bright, so the final step is to limit the light hitting your sensor or film is to use a strong Neutral Density (ND) filter. A ‘two stop’ ND filter will let half of the amount of light in to the sensor compared to no filter for any given combination of shutter speed, aperture and iso calculated for available light levels; a three stop ND filter – a third of the light. For a long exposure photograph like ‘Amble Pier’, a 10 stop ND Filter was used – that is a tenth of the light than would have been allowed in without the filter gets recorded by the sensor (or film).
Ballachulish just after sunset in early September 2015. Looking out to where Loch Leven joins Loch Linnhe near Glencoe in the Scottish Highlands.
I started off with a screw on 10 stop ND filter but I later graduated to a Lee Filters Big Stopper for quality and ease of use – I could focus and then slide the Big Stopper into place before taking the shot. With the screw in version, I sometimes disturbed the focus by screwing on the ND filter. I also have a variable density ND filter – anything up to 6 stops, which can come in handy sometimes.
Ballachulish just after sunset in early September 2015. Looking out to where Loch Leven joins Loch Linnhe near Glencoe in the Scottish Highlands.
My settings for most of these images:-
Interesting view with moving elements like water and/or clouds drifting across the sky.
Safe environment.
Manual Aperture, Shutter speed – on ‘Bulb’ – allows shutter speed of more than 30 seconds.
Aperture f22 to f32 – depending on conditions with a preference for f22 if I can.
Sturdy tripod.
10 stop ND filter (mostly).
Focus camera lens – for landscapes, usually a third onto the frame – hyperfocal focusing.
Unlimited shutter speed.
Electronic cable shutter release with lock function.
Wrist watch (or timer Electronic cable or wireless shutter release) to hold the shutter open for specified time.
Cover for viewfinder.
Once focused, slide 10 stop ND filter into place.
There are ways of calculating the required shutter open time but I tend to start off with an exposure of 2 mins in normal daytime light levels, and then using the camera’s histogram, adjust by increasing or decreasing the exposure from there. If the exposure is not good, I retake after adjustment (and continue until I am happy). If I am happy with my image, I will perhaps choose a different angle and re-shoot – with more of an idea of light levels and exposure settings.
Take plenty of batteries!
One final note; when I started this caper, I was using a DSLR with a mirror. You get a black screen on the back of your camera once you have added the 10 stop ND filter. I now have a mirrorless ‘DSLR’, now I can see a dimmed version of the image even though I have the 10 stop ND attached – I find that reassuring for a last check of the composition before I release the shutter to create the image.
I like these images but I am more than a bit biased as they are ‘like my babies’. Please write to me in the comments with your thoughts on my images, my technique or any other related feedback. All comments welcome and appreciated.
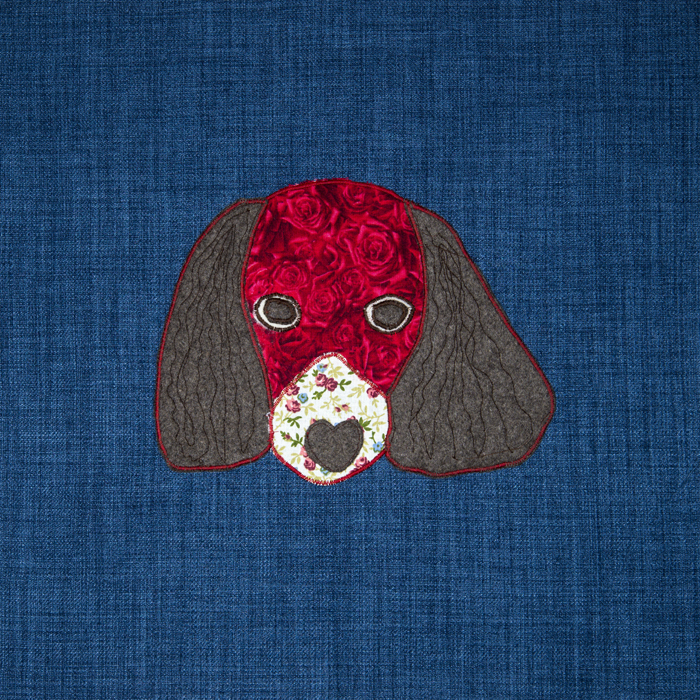
My wife Jane is a textile artist and goes by the name of “The Riverside Crafter”, she just loves anything to do with needle craft and especially patchwork, Applique and embroidery. She recently asked me to photograph some of her most recent work which is destined to become cushions – of course, I was more than happy to oblige and had good fun doing it.
I think that her work is rather good and in the spirit of sharing I am going to show you (we have given all of the works names!):-
This is Hector – a dog appliqued onto blue fabric.
This is Rosie.
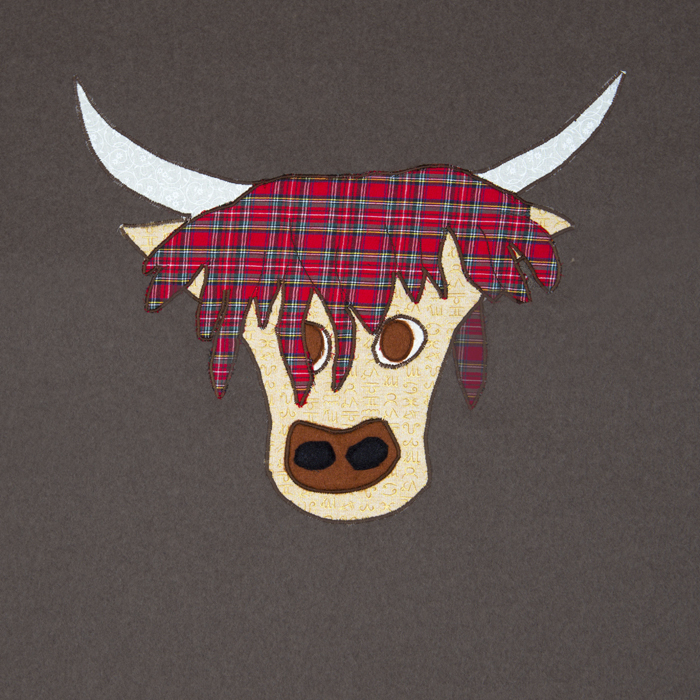
This is Ermintrude – a cow appliqued onto brown felt and named after the cow from the ‘Magic Roundabout’.
This is an example of English Paper Piece – Jane is particularly proud of this one as she learned this art from her late grand mother.
Jane’s version of a hare staring up at the moon – dyed cloth appliqued onto denim layers.
Flora is an appliqued textile cow onto a felt background.
The cow compositions are loosely based on Scottish Highland Cattle; you can see the influences with the tartan and the large horns.
If you enjoyed seeing Jane’s work, pop along to her fledgling blog at:-
I just love photographing Dance, this shot of Nicole, shot at my studio (Studio3bySevern.com) was captured using my amazing Pixapro Storm 400 flash heads.
I always try to visulized the image I want before we start shooting, saves me loads of time.
This reminds me of one of the charictors in the Golden Compas part of Phillip Pullmans Dark Materials trilogy, they have witch queen called ‘Serafina Pekkala’
Life is very busy at the moment – lots of distractions – and I am having difficulty keeping focus on progressing my photography. Often at times like this I go over my older stuff with the intent of giving the old stuff a make over – edit them in a different way to produce something new; I quite like messing around in Photoshop and Lightroom so this quite suits me, although some might say that I should just get out and take some different photographs but somehow with everything else (life) going on it is not always that simple. I am off to Normandy in a few weeks and I have great plans for that trip so watch this space. In the meantime I have been going over my old (2011) Northumberland photos and thought that I would share with you some that I have converted to Monochrome (mostly black and white but I do like the toned effect too) within the Photoshop plug-in Nik Silver Efex pro. I really like these – I wouldn’t be showing you otherwise – and they have had lots of positive feedback when I have posted them on 500px, Pinterest, Facebook, Fine Art America and Photo4Me, so I hope that you like them too.
Lobster pots stacked on the quayside.
Abstract river flow – water taking on a milky form through long exposure.
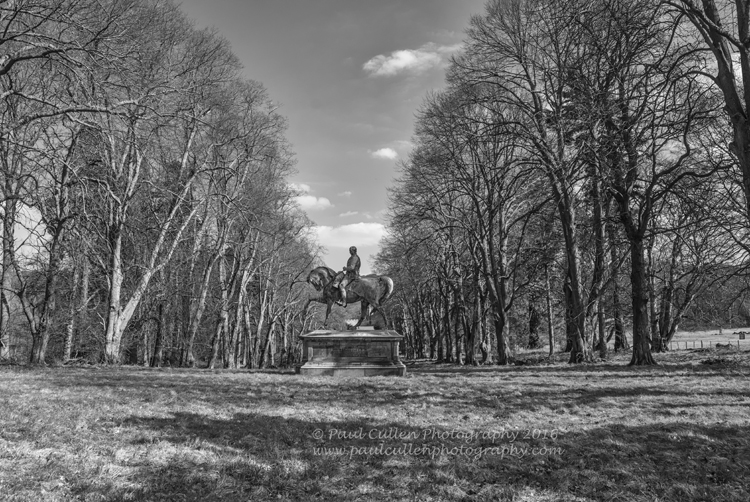
Statue of Field Marshall Viscount Hugh Gough, K.P., GCB, GCSI, PC, who fought many campaigns oversees, now situated at Chillingham Castle, Northumberland.
Statue of Field Marshall Viscount Hugh Gough, K.P., GCB, GCSI, PC, who fought many campaigns oversees, now situated at Chillingham Castle, Northumberland.
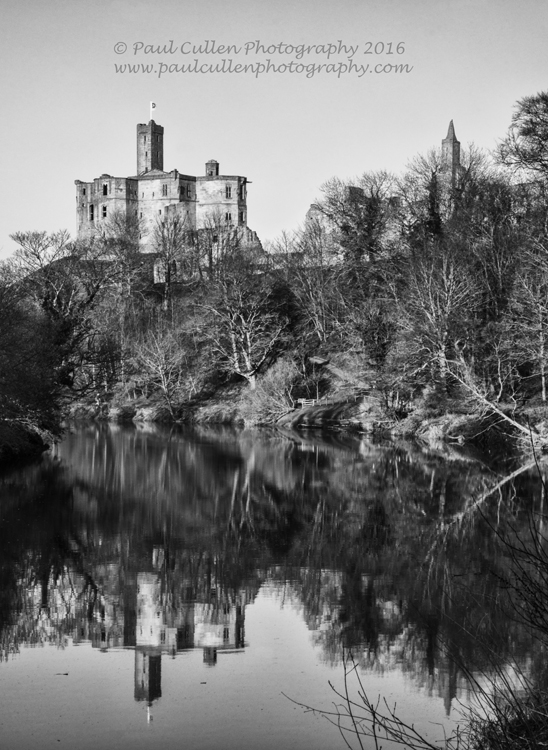
Warkworth Castle, Northumberland.
I love Northumberland and will go back there to capture its natural beauty again but converting to black and white or toning the images give the images a different dimension based on tone and contrast, light and shade rather than colour which changes how we view them.
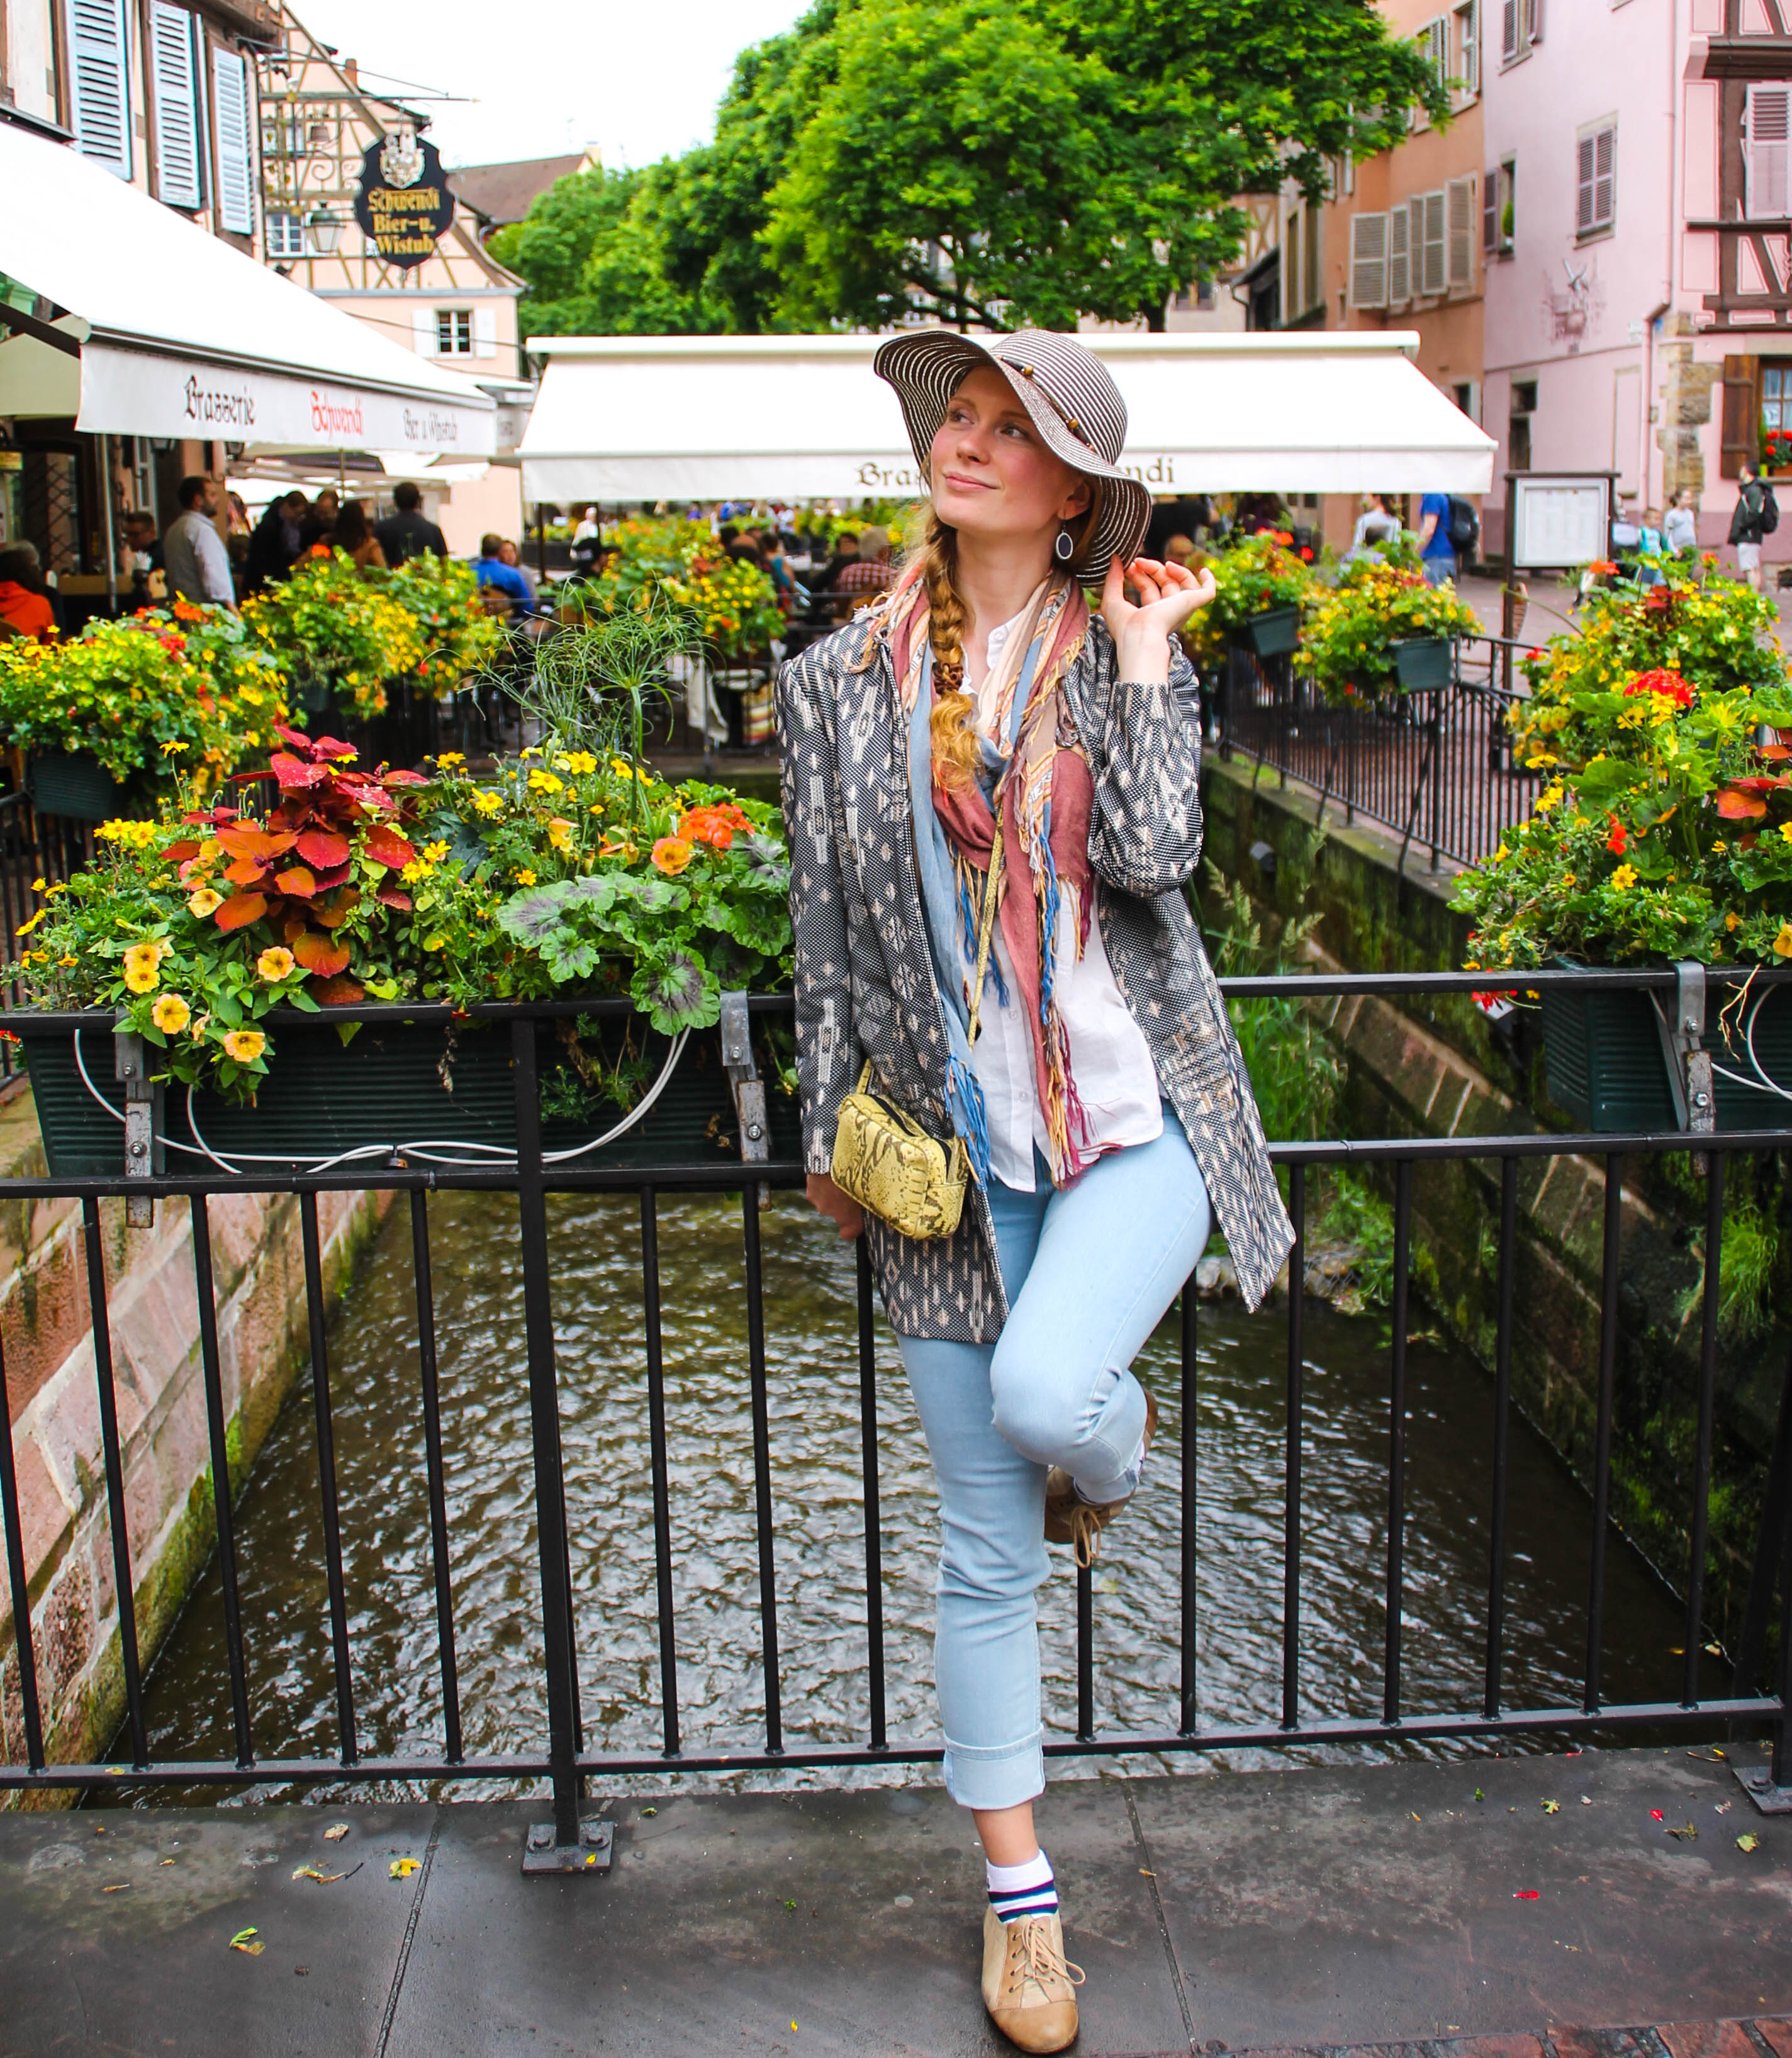
Colmar is indeed a beautiful place. I had the pleasure of visiting Colmar in August 2013 – In addition to the Pinot Gris and Muscat, Alsace is famous for the Gewurztraminer wines which are a must try wines.
Very often, when you are looking through the photos of a place you want to visit, they appear a bit brighter than the place itself when you finally there. Photographers use filters and sophisticated means to make their works if not a piece of art but at least simply look better. I cannot argue, their works are catchy, but sometimes too far away from reality. In that sense, Colmar is exactly the same as when you see it on all the artistic pictures. It is bright and beautiful without any filters and colors’ amplification. Blossoming flowers, sweet gingerbread houses and lively channels… Total awesomeness!
There are many subjects that I want to tackle at some point and this is one of them:-
Wine bottle and glass in low light.
Low key photograph of a wine bottle and glass.
Wine glass and bottle in low light.
Ornate wine glass.
A rim-lit bottle and glass – but I wasn’t sure of the best way of achieving it. I was flicking through this book looking for inspiration (not necessarily looking to fulfil this ambition):-
when I came across the answer, or at least one answer (page 176), I decided to get to work. Lee Frost recommends a large backlight with a strip of black material covering the middle; I used a bit of black card instead as my black material was too heavy but I think that I achieved a pleasing result – here is my set up:-
I have blinds in my studio and so I pulled them all down. Lee describes using “a couple of bottles of decent full-bodied plonk (knowing the contents would have to be consumed afterwards)”, I cheated; I used blackcurrant squash, and a cheap one at that! I didn’t drink the squash afterwards – it only has to look the part right?
I did take a light reading but this was only a ball-park figure as the light meter will give me a mid-tone (18% grey for those who need more detail) but I knew that I was dealing with extremes of the spectrum and not mid ranges – I tried various exposures around me metered reading until I was happy. Aperture was set at f16 so that I had sufficient depth of field and adjusted the strength of the octibox and flash head to get my exposure. I then tried a selection of compositions – the ones that I have shown are the ones that I was happiest with.
Post processing consisted of fiddling with contrast, saturation and exposure in Lightroom – I like to selectively sharpen my images so that large swathes of one colour, in this case black, don’t end up generating digital noise. I also made sure that I had absolute black when appropriate, for the same reason. I output my files from Lightroom as TIFFS in case I want to edit further in Photoshop.
I decided to try then as monochome images too; again I was pleased with the results:-
Wine bottle and glass in low light – monochrome with a slight yellowed tone.
Low key photograph of a wine bottle and glass in high key monochrome.
Wine glass and bottle in low light – monochrome with cool blue tones.
Ornate wine glass – in monochrome.
I created monochrome images in Nik Silver Efex pro. I gave each a different treatment; one has a sepia effect, anther a cool blue tone whilst the other two are black and white.
It is not that easy to see the subtle changes in treatment here but they can be seen in greater detail in my My 500px Fine Art Gallery here (the colour versions are there too).