As a photographer, I am often asked “what type/make of camera do you recommend?” and often the person who asked the question is disappointed when I reply with another question “what type of photography do you want to do?” or “what do you want to do with it?” (Obviously take photographs), but I’ll often follow up with “does it need to fit in your pocket?” and other questions regarding intended use. The reason is that my recommendation largely depends on what your expectations of your intended purchase. Every type of camera has good points and negative points so what I plan to do here is to discuss those advantages and disadvantages of each common type of camera. Often ease of use is traded against quality and versatility. I have several types of camera (and I don’t mean makes) and I use each for a different purpose.
Mobile Phone/Tablet/iPad/Kindle Fire:-
Most people have their (smart) mobile phone or tablet with them and that Mobile phone or tablet has a camera with in excess of five mega-pixels. There are applications which can enable you to get your photos onto Twitter, Facebook, Snap chat, instagram or many other such means of communication instantaneously – brilliant! Yes it is, but those five megapixels are packed onto a tiny sensor so the image quality suffers with digital noise – lots of spots (particularly green and red) in the shadows or perhaps all over. If spontaneity and connectivity is your thing then this is for you; if you want to print high quality images then choose another means of recording your photo. Very portable and the device has many other uses but not made with quality in mind. There are software packages both in app (i.e. Instagram) or standalone (Adobe do a free version of Photoshop) available so that you can edit your pics on the fly.
Compact camera.
A popular choice, and for good reason. Most people will be happy with a compact camera as it is easy to use and fits in your pocket easily. You can always have it with you so you need never miss a thing.
There are some very good compact cameras and the picture quality is very good for most things. You can set it to automatic and “point and shoot” and the camera will get the exposure right most of the time. Many compact cameras include “face recognition” so they find faces (or face like shapes) and automatically prioritize them in the image.
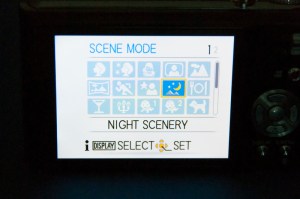
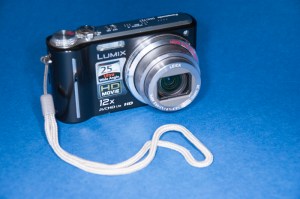
Alternatively, you can select a scene mode so that the camera “knows” what kind of photograph that you want to take and chooses the most appropriate settings for that type of photography; for example, for landscape pictures, the camera will try to get as much of the picture sharp from the front of the picture to the back – it’s ability to do this is limited by the amount of light available – easier on a bright sunny day than at dusk (or at night!) For portraits, the priorities are different with an emphasis on face recognition. Taking a photograph of a race would necessitate a fast shutter speed to capture the action without blur so, in the example above, you would select the “running man” for best results – so the cameras best guess attempt at the correct settings are going to be more accurate than purely on Auto. Sometimes there are quirky scene modes; another camera that I own has a setting for creating photographs which appear to have been taken with a “Fisheye” lens (very wide angle) for artistic effect and can create what looks like a pencil drawing on another setting – definitely an acquired taste but it is the main reason that I still have that camera. The Panasonic Lumix (pictured above) has a setting where you can adjust some of the settings manually for more versatility, creativity and control but there are limits that you would not have with more “advanced” cameras where you can have full manual control. I keep this camera because it fits in my coat pocket easily and the quality of the photographs is very good. There are many good makes of compact digital camera out there – I can recommend the Panasonic Lumix range, particularly those with the Leica lenses (like the one pictured) not the cheapest option but worth the money if you want to go down the compact route. Avoid the really cheap ones – I had bad experiences with Practika a few years ago.
Disadvantages: –
- Can limit your creativity because of a lack of manual options and like the Phones/Tablets etc.
- The sensor is very small (although, not as small as in many Smart phones) so not as good as some other cameras for quality – you couldn’t use it professionally, but the quality is good enough for most purposes.
- For ease of use, portability and ability to do a good job most of the time this is for you. I use mine a lot for record shots/snapshots/memories but when quality really matters and I need full control, I use a different camera and that camera is:-
Digital SLR:-

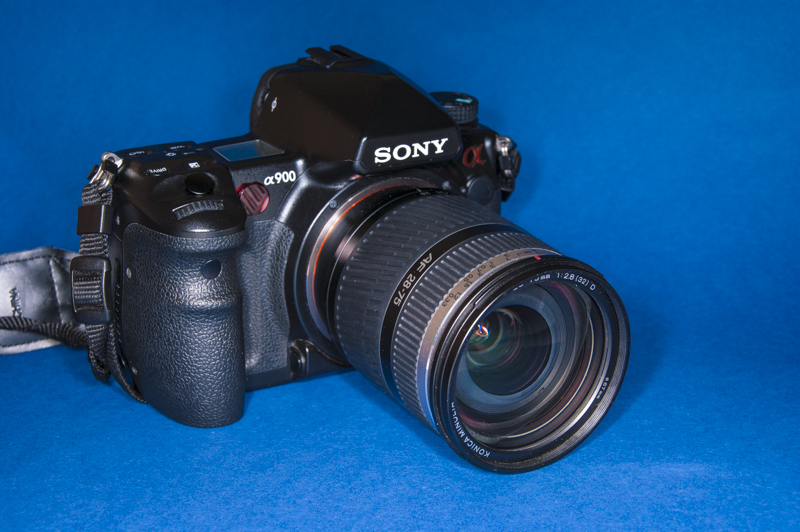
SLR stands for Single Lens Reflex and that is to do with the fact that as you look through the viewfinder you can see through the lens and see the image that you will be photographing as opposed to looking through a separate viewfinder as we did in “the olden days” – sometimes the image that you saw through the viewfinder was not quite aligned with the lens. That type of camera (actually two, a range finder and a twin lens reflex) are still available but are not used widely in the digital age. There are advantages and disadvantages with these cameras as here are with all cameras:-
- The above model weighs 1.2 Kg and doesn’t fit in my pocket for a start!
- It produces the best image quality of any of the cameras discussed here.
- The sensors of these types of camera come in different sizes but they are all much bigger than Smart phone/Tablet cameras and compact cameras and so produce much better image quality.
- They also have a wide range of lenses that can be fitted onto them so they are very versatile.
- Full manual control (if you want it – which I often do).
- They also offer a range of options in between from “semi-automatic ” to fully “automatic”. To get the best out of this camera, you really need to know some of the technical stuff about the available controls of Aperture, shutter speed and sensor sensitivity (iso) and the reciprocal relationship between them – it isn’t difficult to learn, but you need to know it if you are going to get past “Program” or “Automatic”. You can pick up some very good Digital SLR cameras at a reasonable price but you can get a good compact much cheaper, especially when you take into account separate lenses and accessories that you will want to buy (believe me) after you purchase one of these. I use this camera most of all for versatility, quality and control.


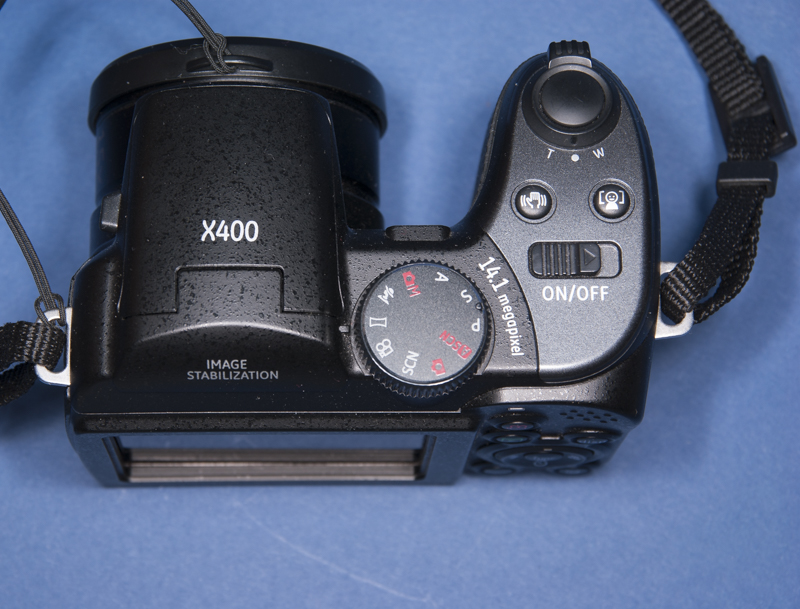
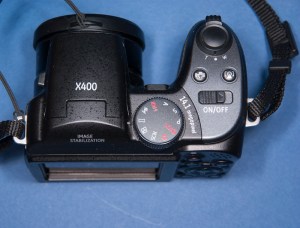
I want to draw your attention to the dial on the left side of the top of the camera and I will briefly explain the different settings:-
M Manual setting of Aperture (the size of the hole that the light goes through in the lens), Shutter speed (how long the shutter stays open to let the light in to expose the sensor) The camera has a built-in light meter to tell you if the settings will give you a “good” exposure at these settings but it will let you carry on anyway. The Third variable is the Iso (button on the right of the picture) which adjusts how sensitive to light the sensor which will record the image is.
S (Shutter Priority). This setting is one of the semi-automatic modes where you set the shutter speed, expressed as a fraction of a second, and the camera sets the aperture to allow what the camera’s internal light meter has deemed to give a good exposure. You would use this setting if you wanted to capture a fast moving subject without blur (setting a very fast exposure), or conversely, a very slow exposure time (slow shutter speed) if you wanted a subject like flowing water to be blurred in your image.
A (Aperture priority). This is the other Semi-automatic mode on your camera. You would use this setting when you wanted to set the aperture size, expressed as an F-stop; Large aperture size = more light allowed through the lens in a given exposure time, small aperture = less light. You set the aperture and the camera sets a corresponding shutter speed to give what your camera’s light meter judges to be right for correct exposure. F-stops are numbered and this numbering system can seem confusing; there is a mathematical equation that governs the numbers. You could look it up on Wikipaedia if you felt so inclined but it is not necessary to understand it to that level. What you need to understand is that small number = large aperture = more light into your camera to expose the image sensor, and that as you select (certain) higher numbers, there is exactly half the amount of light hitting the image sensor over a given time, or if you make the aperture smaller by one (full) stop, the shutter speed would have to be twice as long to get the same amount of light hitting the sensor. I am not going to say anything else about the reciprocal arrangement between iso, aperture and shutter speed at this stage apart from the fact that the camera will work it out so that you will get a correct exposure in most cases. I know that sounds a bit vague, but sometimes the cameras exposure meter gets it wrong in difficult lighting conditions and it can be a problem whatever kind of camera you have. The camera works the exposure out for a given iso setting (sensor sensitivity). The reason why you might want to adjust the aperture is the important thing:-
A large aperture (small F-stop number) may be used when you want only the subject itself in sharp focus and everything in front of, and behind in soft focus or even blurry. It is called a narrow (or differentiated) depth of field. This is useful for portraits, when you might want to highlight the subject and reduce distractions from the foreground and background.
A large aperture will also allow more light to hit the sensor in low-light conditions (but remember the shallow depth of field – you can also get around this by increasing the iso (sensitivity) of the sensor).
A small aperture will increase the depth of field ensuring that your Landscape photos are sharp from front to back.
A small aperture is useful in very bright conditions. But be aware that everything is likely to be in sharp focus and for the wrong subject; distracting elements can catch the viewer’s eye. There are other ways of dealing with the problem such as reducing the sensitivity of the sensor or certain filters that you can use to reduce the amount of light without changing the colours in your photo. (Further reading required).
Aperture priority is probably the most commonly used mode on Digital SLR cameras although many professionals would swear only to use manual.
P (Program mode). This mode allows you to set certain settings such as how your camera meters and the sensor sensitivity but will take care of the shutter speed and aperture. Many cameras allow temporary setting of Aperture or shutter priority so that it acts like S or A will revert back to setting these variables itself once you switch off your camera. I have never used it but it is useful if you want some creative control but are not ready to take all of it.
AUTO. All settings are automatic. This turns your DSLR into a point and click camera in the best sense (and worst) of the word. You will get the cameras best judgement (guess) based on what it senses. It will produce a decent picture most of the time but takes any creative control out of your hands. You will have the benefit of that larger sensor giving better quality images if you want to print them very large. Many people use this mode when they first buy a DSLR, and there is nothing wrong with that, but generally get disappointed with some of their results and learn how to use the other controls.
1,2,& 3. Once you become familiar with your camera, you can program these controls with your most commonly used settings in terms of iso, aperture, shutter speed, metering mode (which I haven’t mentioned yet), whether you want to record your images as Jpegs, RAW or both and the quality that you want to save them at. Better quality = larger files=less files per memory card. If your photos are only going onto the internet, you don’t need the higher quality files so you can get more on your card. You can set your three favourite sets of settings!
If you are sitting there thinking “this all sounds a bit complicated”, don’t worry. With a DSLR you can use fully automatic if you want, and that is Ok, but it will allow you the most creative control also if you want to take it, and there are several semi-automatic shades in between, so you have the choice to use your camera in the way in which you are most comfortable.
Now the downside:-
- Most expensive generally available option.
- Once you get into changing lenses, you must also consider sensor cleaning (either yourself or have it done professionally).
- My DSLR weighs 1.2 kg with a modest lens, although much lighter models exist, it is still the heaviest option.
- Not as portable as other options.
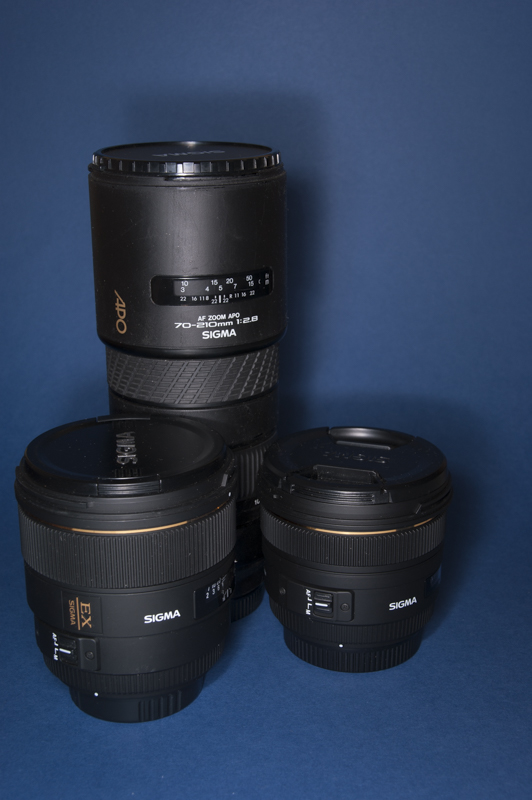
Each manufacturer has their own propriety lens fit so you need to buy from that manufacturer or obtain your lens from a third party vendor but it will only fit cameras from that manufacturer. When you buy your camera, you are buying into a system. I have several lenses; if my camera breaks then it will be easier to buy the same brand again so that all my lenses will still fit the new camera.

These are some of my lenses and each does a different job which can be a blessing as well as a curse (expensive).
You may also become inclined to buy accessories such as tripods, filters, remote shutter releases, light meters, studio flash, to mention a few things. You only need to look at the many Photographic magazines for inspiration and the contact details of the vendors! It can take over your life.
There are now ranges of cameras from many of the major manufacturers which have many of the advantages and disadvantages of DSLR including interchangeable lenses but are smaller and so easier to carry. The lens selection is limited at the moment but third party vendors are starting to get on board. Examples are the Sony A7 and A6000 ranges, Fuji X100 and the Olympus Pen range.
Bridge cameras.
There is another choice which has many of the advantages of the DSLR:-
- larger sensor (better quality images).
- (Most have) Manual control I.e. you can set the Aperture, Iso, Metering mode, and shutter speed yourself and the camera will let you take the picture whether it thinks that you are right or wrong (Handy in less than favourable light when you want to over-ride the recommended settings or want to use studio flash to name a few opportunities when you might want full control). The amount of latitude that you have you have with adjustment of these settings varies dramatically depending on manufacturer and model).
- You get a reasonable quality lens which will go from very wide angle to very telephoto (which is permanently attached so you don’t have to worry about having to clean your sensor periodically).
- You will be able to set Auto, Program, Aperture priority, Shutter speed, Iso, Metering mode.
Some of the disadvantages include:-
- Limited to one lens.
- Still quite bulky, although this varies by Manufacturer and model.
- Less accessories for creative control.
- Less latitude in adjustment of settings than DSLR.

A bridge camera from GEC. As you can see, it has many of the same controls as the DSLR.
Conclusion.
Your choice of type of camera really is dependent on what you expect from it and what your needs are. If your priority is for ease of use, portability and the ability to share on social media but you are willing to compromise on quality then the Smart phone or tablet camera is probably for you.
If your priority is for an easy to use, easy to carry camera that you can have with you all of the time to record memories but you are not really interested in producing photos for galleries or really big prints and are willing to compromise on creative control because recording the moment is more important than producing fine-art then a compact camera may be your best bet.
If you want full creative control with the ability to expand your creativity infinitely with full and absolute control, you want the best image quality that is generally available (there are some specialist solutions that are not widely available and are usually prohibitively expensive), but don’t mind hauling round at least one heavy bag, then a Digital SLR may be your best bet.
If you want good image quality and full control but are willing to compromise on expandability then a bridge camera may suit you best.
It is your choice.
My choice is that I have a good compact which I am seldom without so I never miss a thing but when I am looking for quality i.e. anything that I am looking to sell or print I have my DSLR.
There are things that I haven’t elaborated on in this guide as they are beyond the brief that I have set for this. Things such as metering mode and iso have been left without adequate explanation so as not to complicate things any more than necessary. They are important and affect all cameras from compact to SLRs. There are good books written by the likes of Ton Ang, Michael Freeman and John Hedgecoe which are available from “all good bookshops” which explain these terms and other important subjects very well. Your new cameras instruction manual will make a reasonable attempt at explaining them too, don’t worry.
My recommendations.
Compact cameras.
Most compact cameras will do a decent job within the limitations previously stated. I would avoid the really cheap ones such as Practika but those from the likes of Sony, Fuji, Samsung, Canon, to name a few will generally do a decent job. My personal preference is for the Panasonic Lumix Range of compact cameras, the ones with the larger lens on the front would be generally better quality – mine was branded Leica (the lens that is). They are slim, compact and produce excellent results. Panasonic also have a range of Bridge cameras under the Lumix name also which are reputed to be good.
Digital SLR Cameras.
The offerings from Canon, Nikon, Pentax, Olympus and Sony all produce excellent results and each has its strengths and weakness, but in reality there is little to choose between them and down to personal preference. Hardened enthusiasts generally form groups in either the Canon or the Nikon camps and most third party manufacturers have most to offer to Nikon and Canon users. The more compact cameras such as the Sony A7 and A6000 ranges, the Olymus Pen range and the Fuji X100 are worth a look.
Bridge cameras.
Again the offerings are very good – don’t buy the GEC model; the image quality is not the best. Sony, Canon, Pentax, Nikon, Panasonic, Fujifilm, and Olympus will all deliver good results; read the specifications and buy the model that most meets your needs without buying features that you will never use.
Sadly, there is no easy answer to the question “which is the best kind of camera to buy?” But I hope that my guide has thrown some light (no pun intended) onto the choice and the advantages and disadvantages of each type of camera.